High-Protein Greek Yogurt Pizza Dough Recipe: Quick, Easy & No-Yeast Required!
Transform your weekly pizza night with this incredibly simple and delicious Greek yogurt pizza dough recipe. It’s quickly become a household favorite for its amazing flavor, chewy texture, and fantastic nutritional profile. Forget about long rise times or complicated stand mixers – this recipe delivers a perfect pizza crust with minimal effort, making it ideal for busy weeknights or impromptu gatherings.
Not only is this dough exceptionally high in protein, thanks to the star ingredient, Greek yogurt, but it’s also incredibly versatile. This recipe yields one medium-sized pizza or two smaller personal pizzas, allowing for customized toppings to please everyone. Plus, we’ve included options for a gluten-free version and even air fryer instructions, so everyone can enjoy a slice!

In our constant quest to infuse more protein into our favorite comfort foods, pizza was an obvious choice! This Greek yogurt dough provides a satisfying boost that keeps you feeling fuller longer, without compromising on that classic pizza taste and texture you crave.
This effortless Greek yogurt pizza recipe is unbelievably quick to prepare, loaded with protein, and tastes every bit as good as traditional homemade pizza. We’ve rigorously tested it countless times to ensure absolute perfection before sharing it with you. You can trust that this recipe will deliver consistent, delicious results every single time.
If Friday pizza nights are a tradition in your home, you’re going to adore this easy and healthy alternative. Serve it up with a fresh side salad or some crisp crudités for a complete, guilt-free meal!
Why You’ll Love This Greek Yogurt Pizza Dough:
- Remarkably High in Protein. Unlike conventional pizza doughs, this recipe leverages the power of Greek yogurt, packing a significant protein punch. This means a more satisfying meal that helps support muscle growth and keeps hunger at bay.
- Made with Simple, Accessible Ingredients. You likely already have everything you need in your pantry! With just flour, Greek yogurt, a few basic seasonings, and your favorite toppings, you’re ready to create culinary magic. No obscure ingredients or specialty stores required.
- Absolutely No Rise Time! This is a game-changer! Because this dough uses baking powder instead of yeast, there’s zero waiting time for the dough to rise. It’s perfect for those spontaneous pizza cravings or when you need a quick, delicious dinner on the table in under 40 minutes.
- No Stand Mixer Needed. All you need are your hands and a bowl. This recipe is designed to be effortlessly mixed and kneaded, making it accessible to everyone, regardless of their kitchen equipment.
- Customizable for Dietary Needs. Whether you’re opting for gluten-free flour or adjusting toppings for vegetarian preferences, this dough is incredibly adaptable. It’s a versatile base for all your creative pizza ideas.
Ingredients for the Perfect Greek Yogurt Pizza
Crafting this amazing pizza dough requires just a few pantry staples. Here’s a closer look at the key ingredients:
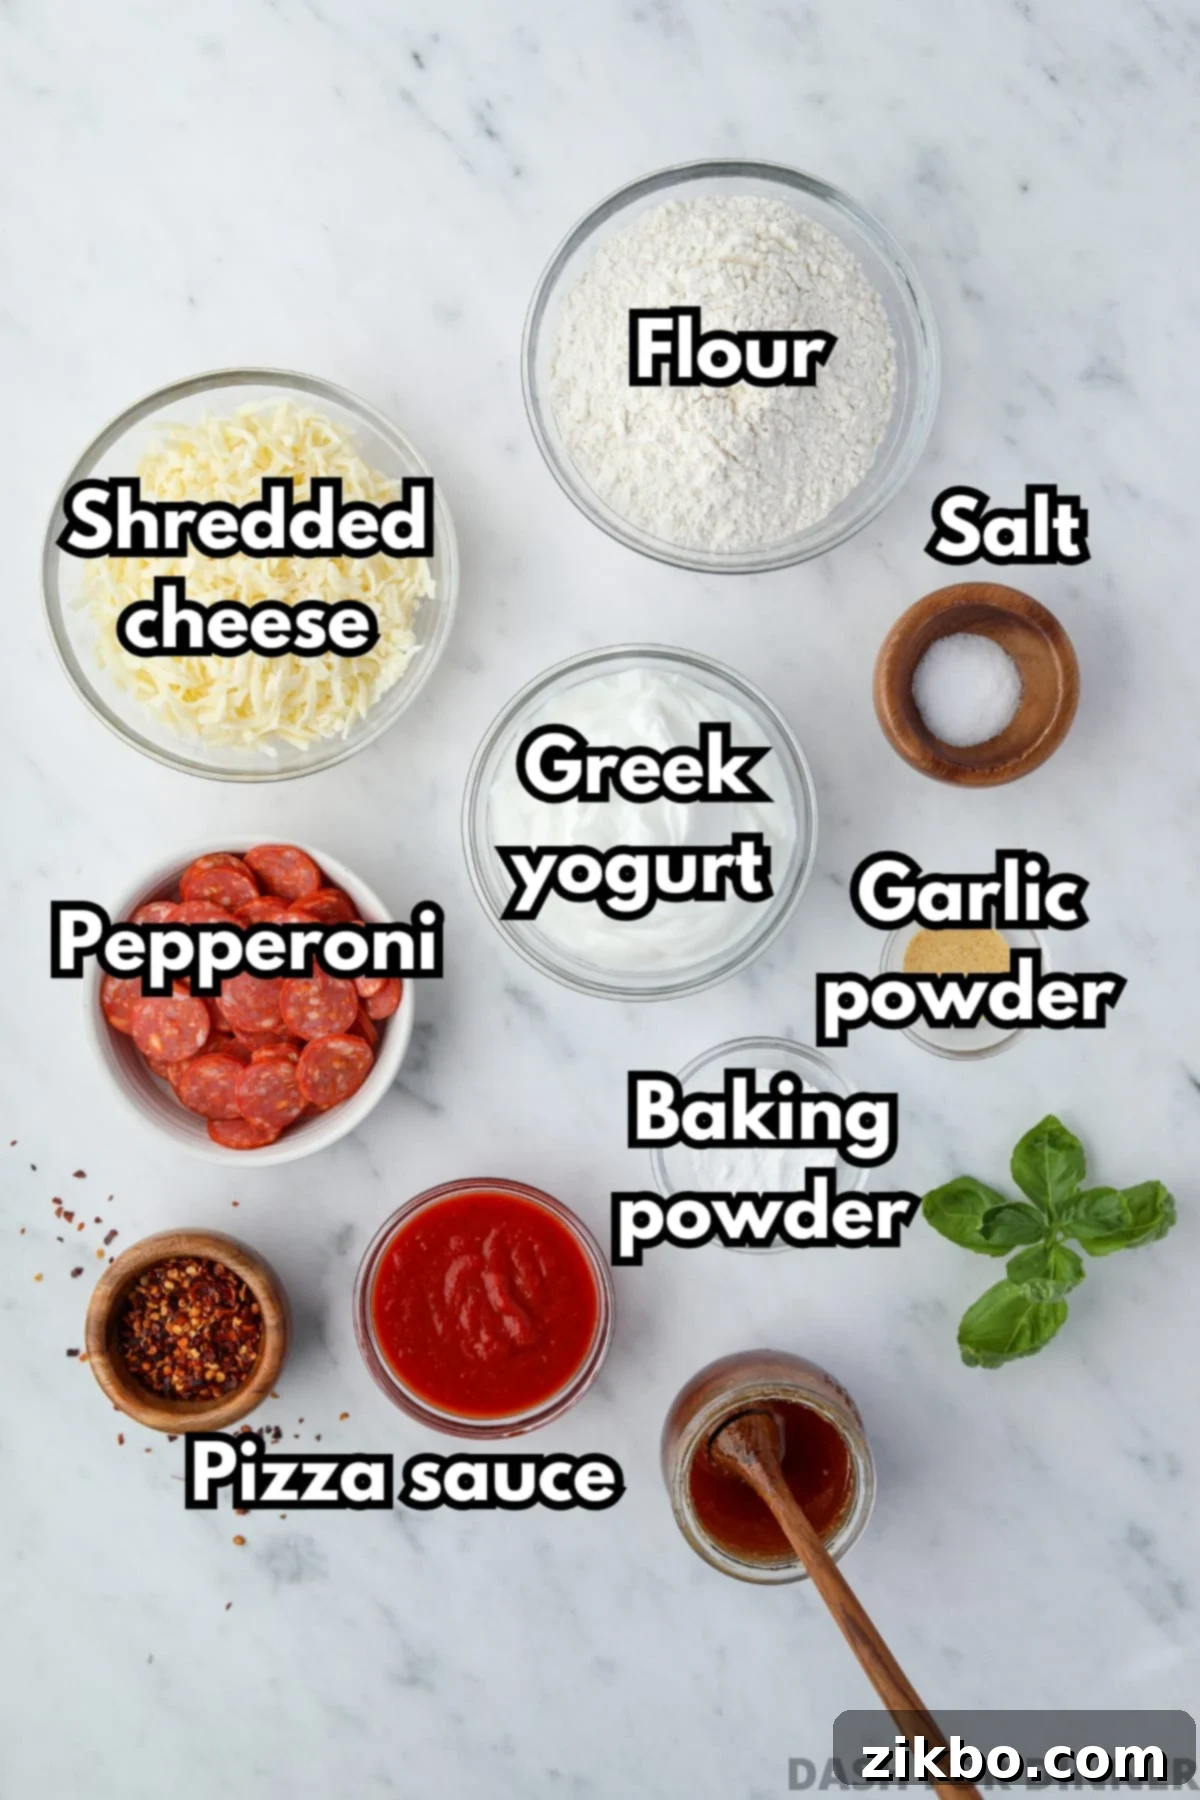
- All-Purpose Flour: Standard all-purpose flour works wonderfully as the base for this dough, providing a familiar texture and structure. If you happen to have self-rising flour on hand (or prefer to make homemade self-rising flour), you can easily use it by simply omitting the baking powder and salt specified in the recipe.
- Greek Yogurt: This is the star ingredient! You can use any plain Greek yogurt or skyr yogurt. While 0% fat yogurt works perfectly fine and keeps the calories lower, our testers actually preferred types with a little fat content (1%, 2%, or 5%). The slight fat content contributes to a slightly richer flavor and helps the crust achieve a beautiful golden-brown color and a crispier texture.
- Baking Powder: This is the leavening agent that gives our pizza dough its wonderful lift and airy texture, all without the need for yeast or lengthy rising times. It reacts with the acidity in the Greek yogurt to create bubbles, resulting in a soft yet firm crust.
- Garlic Powder: A secret weapon for flavor! Adding garlic powder directly to the dough makes a significant difference, infusing the crust with a savory aroma and subtle garlicky taste that complements any topping. We highly recommend including it for an enhanced flavor profile.
- Salt: Essential for seasoning the dough, salt balances the flavors and enhances the overall taste of your pizza. Any fine-grained salt will do the trick.
For Assembling Your Perfect Pizza:
- Pizza Sauce: Your favorite store-bought or homemade pizza sauce is perfect.
- Shredded Cheese: We typically use shredded mozzarella cheese or a pre-shredded pizza blend for convenience and optimal melt. Feel free to experiment with other cheeses like provolone or a mix of Italian varieties.
- Your Favorite Toppings: The possibilities are endless! Think classic pepperoni, savory mushrooms, a drizzle of hot honey for a sweet-spicy kick, creamy feta, or any other delicious additions you desire.
How to Make Greek Yogurt Pizza Crust: Step-by-Step Guide
This Greek yogurt pizza delivers all the deliciousness of “real pizza” while being packed with protein, requiring NO yeast or rising time, and getting dinner on the table in under 40 minutes!
How to Prepare the Dough:
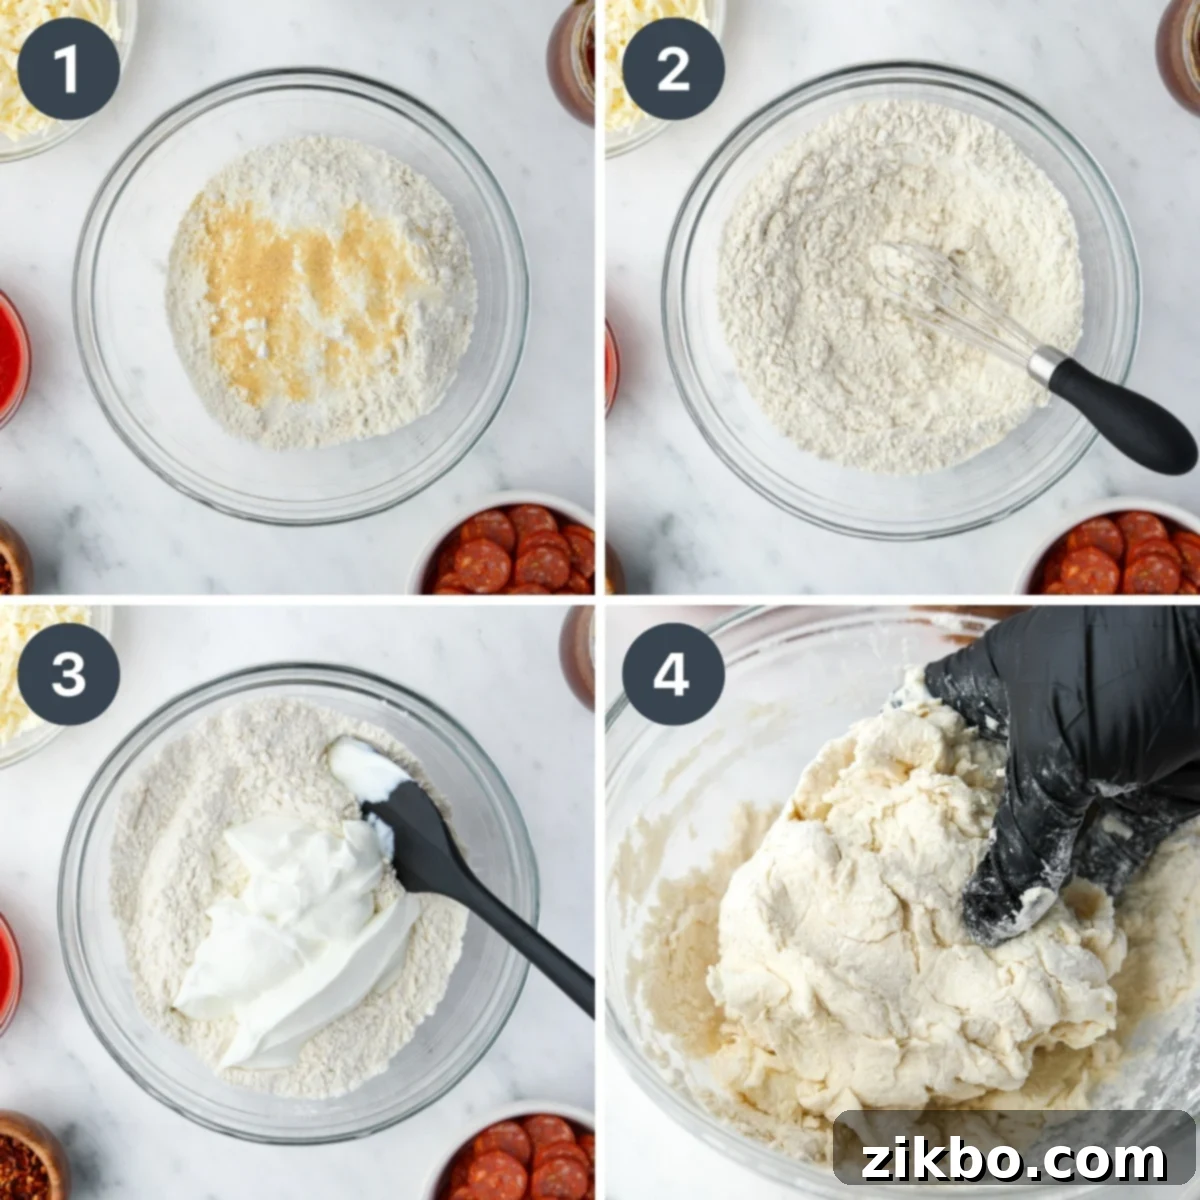
- Combine Dry Ingredients: In a medium-sized mixing bowl, add the all-purpose flour, baking powder, garlic powder, and salt.
- Whisk Thoroughly: Whisk these dry ingredients together very well to ensure they are evenly distributed. This step is crucial for consistent leavening and flavor throughout the dough.
- Add Greek Yogurt: Carefully weigh or measure out your Greek yogurt and add it to the bowl with the dry ingredients. Use a silicone spatula to fold the yogurt into the flour mixture as much as possible, forming large, crumbly lumps.
- Knead the Dough: Now, it’s time to get your hands dirty! Lightly dust your hands with flour or, even better, wear disposable food prep gloves to prevent stickiness. Gently knead the dough within the bowl. Continue kneading until all the flour is absorbed, and the mixture comes together into a cohesive, smooth, and manageable ball. Avoid over-kneading, as this can make the dough tough.
Shaping and Baking Your Pizza Crust:
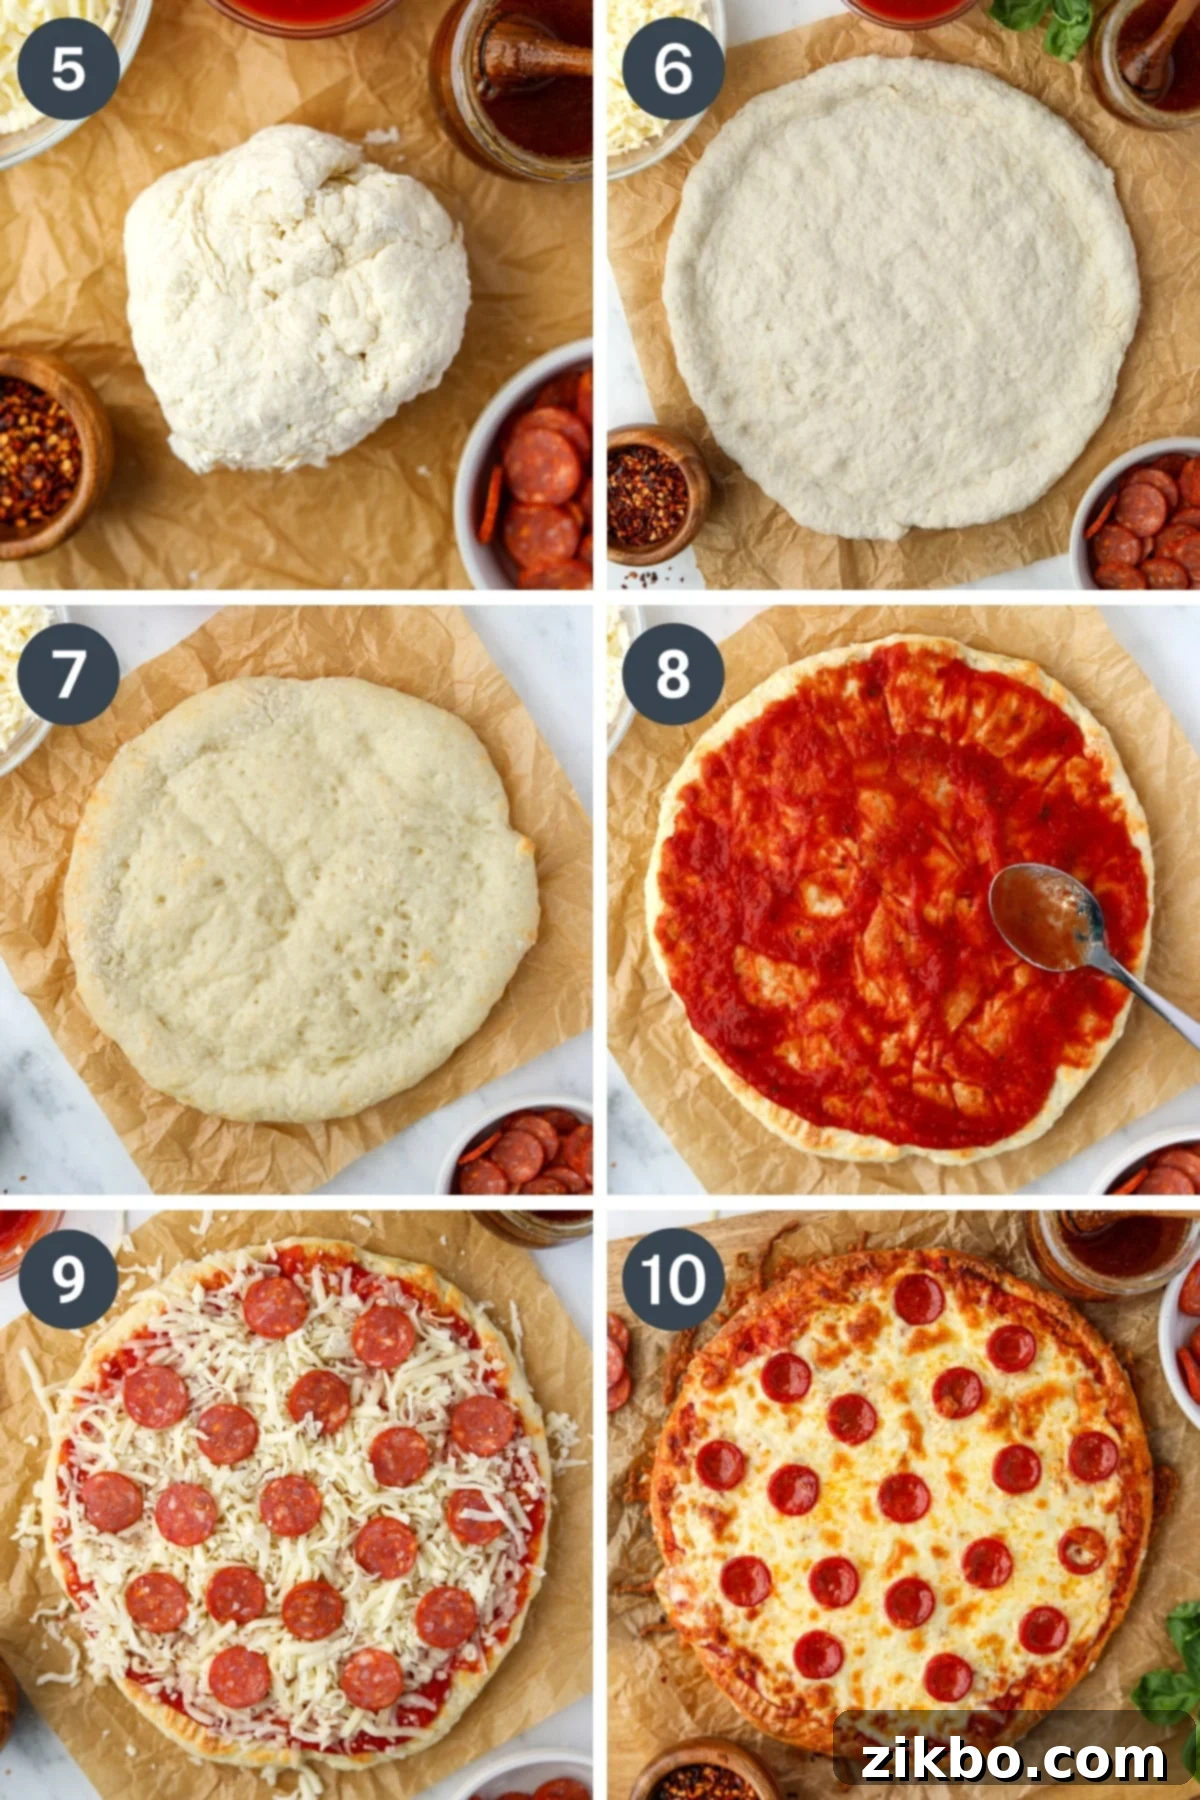
- Prepare for Shaping: Place your freshly kneaded pizza dough ball onto a large sheet of parchment paper. This prevents sticking and makes transfer easier.
- Shape the Crust: Using your hands (again, gloves are helpful here!), begin pressing the dough outwards from the center to form a circle approximately 9 ½ to 10 inches wide. As you work, reshape the edges by gently cupping your hands and pushing the dough back in to create a slightly raised crust. Don’t worry if it’s not perfectly round; homemade charm is part of the fun! (Refer to the video in the recipe card for a visual guide on shaping).
- Pre-bake the Crust: Transfer the parchment paper with the shaped pizza crust onto a pizza stone or a dark-colored baking sheet. Bake in a preheated 425ºF (220ºC) oven for precisely 10 minutes. This initial bake helps set the crust and prevents it from getting soggy.
- The “Flip” Secret: After 10 minutes, carefully remove the baking sheet from the oven. This next step is key to a perfectly crispy crust! Gently lift the pizza dough from the parchment paper and flip it over. Yes, it might seem unusual, but this technique ensures the crust develops a fantastic texture and prevents the sauce from soaking through, giving you a superior pizza experience.
- Chef’s Tip: I typically do this quickly with my bare hands, but if you prefer, a silicone spatula can assist in the flip. Be swift but gentle!
- Add the Sauce: On the newly flipped-over side of the crust, evenly spread about ⅓ cup of your favorite pizza sauce using the back of a spoon.
- Load Up the Toppings: Generously sprinkle shredded cheese over the sauce, followed by your chosen toppings. Don’t overload it, as this can make the pizza difficult to cook through evenly.
- Final Bake: Return the pizza to the oven and bake for an additional 10-12 minutes. Continue baking until the cheese is beautifully melted and bubbly, and the edges of the crust are golden brown and crispy.
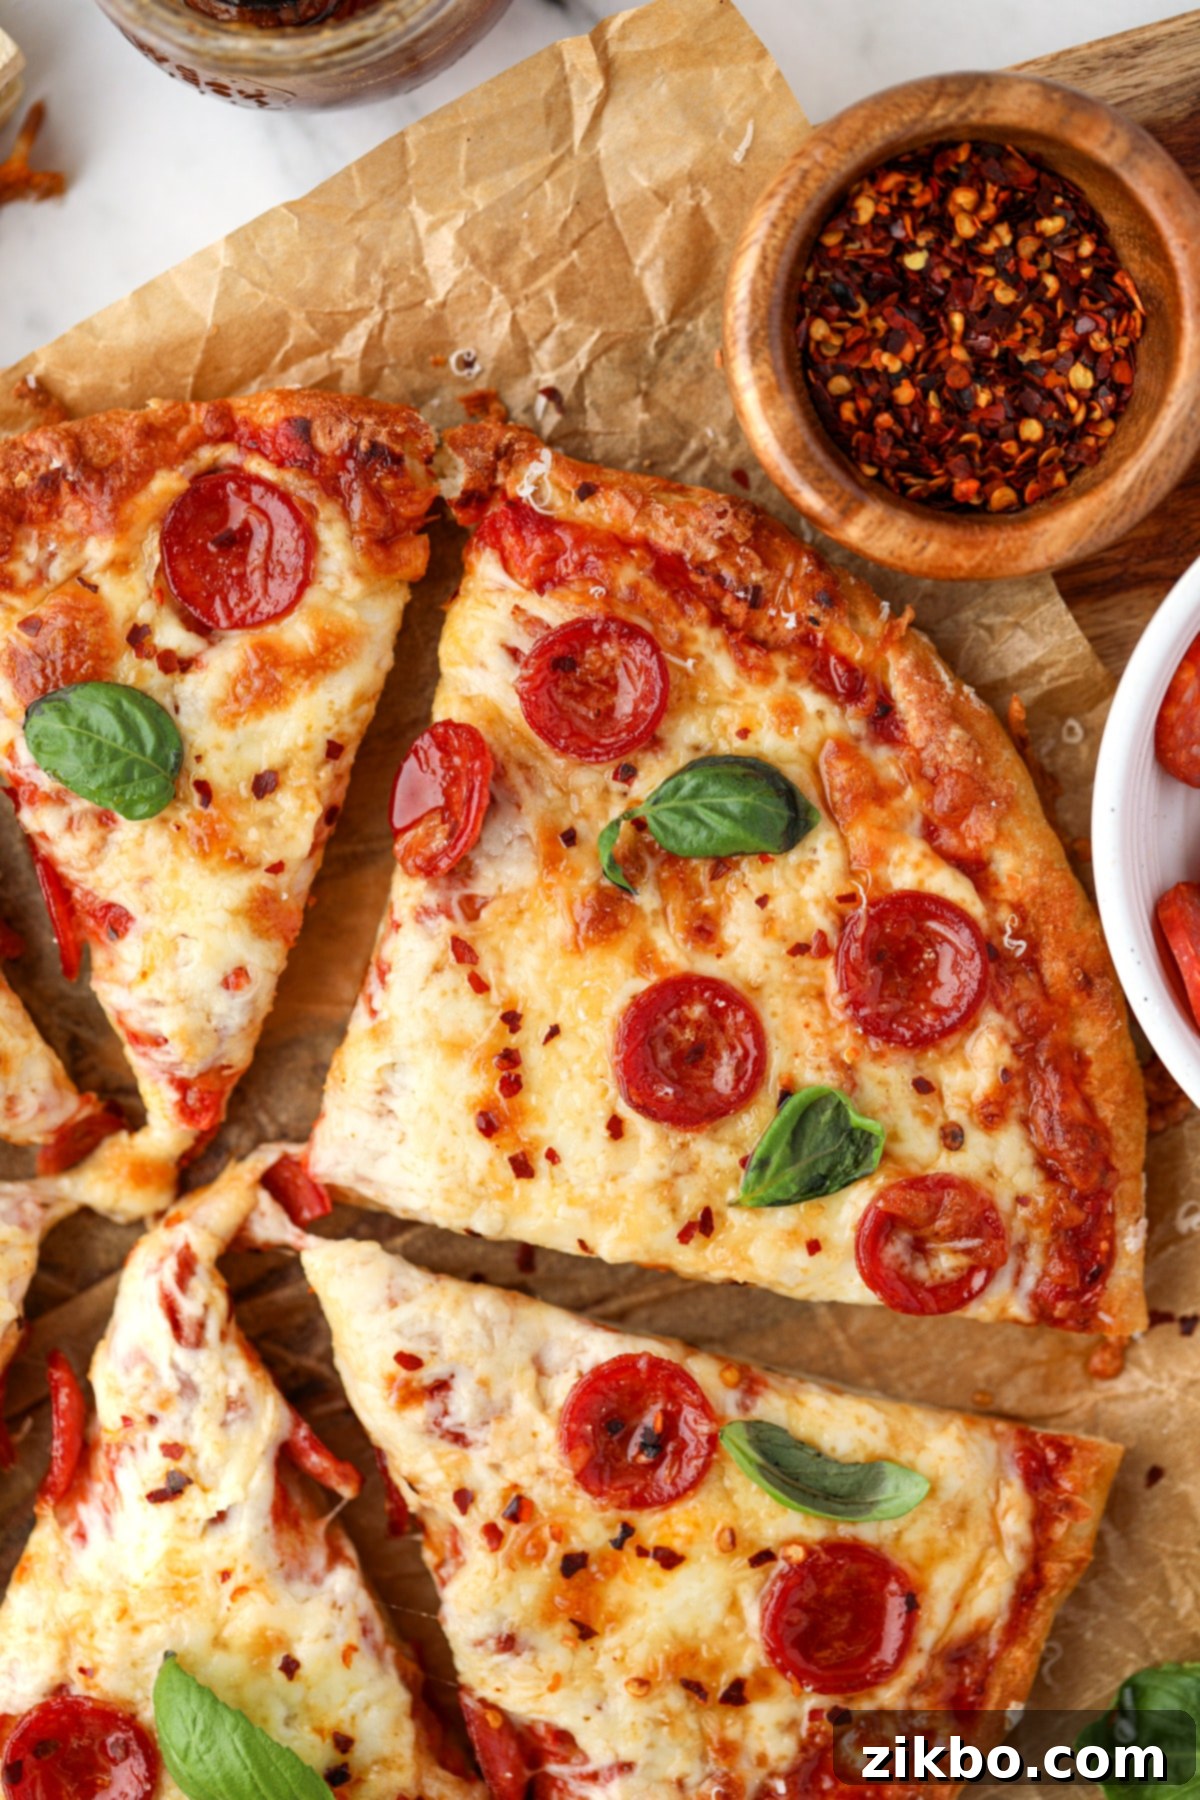
- Cool and Serve: Once baked to perfection, carefully remove the pizza from the oven. Allow it to cool for 3-5 minutes before slicing. This brief cooling period helps the cheese set and makes for easier, cleaner slices. Garnish with fresh herbs like basil or a sprinkle of red pepper flakes if desired.
Top Tip: For an Even Crispier Crust
For an extra layer of flavor and an irresistibly crispy crust, lightly brush the edges of the dough with olive oil (or garlic-infused olive oil) just before its initial bake in the oven. This optional step adds a gourmet touch that truly makes a difference.

Delicious Topping Ideas for Your Greek Yogurt Pizza
This high-protein pizza dough is a blank canvas for your culinary creativity! Here are some fantastic topping combinations to inspire your next pizza night:
- Classic Meat Lovers: Pile on pepperoni, savory sausage crumbles, crispy bacon bits, or seasoned ground beef for a hearty meal.
- Fresh Margherita Style: Keep it simple and elegant with fresh sliced mozzarella, vibrant fresh basil leaves, and a drizzle of olive oil after baking.
- Vibrant Veggie Delight: Load up on your favorite vegetables like sliced mushrooms, crisp green peppers, thinly sliced red onion, or sweet cherry tomatoes.
- Mediterranean Inspired: Add a briny kick with black, green, or Kalamata olives, paired with crumbled feta cheese.
- Sweet & Spicy Sensation: Our personal favorite – a generous drizzle of hot honey or a sprinkle of crushed red pepper flakes over your finished pizza. The contrast is incredible!
- Gourmet Fig & Goat Cheese: For a sophisticated flavor profile, spread a thin layer of fig jam as the base, top with crumbled goat cheese and a sprinkle of fresh rosemary. Drool-worthy!
Gluten-Free Version of Greek Yogurt Pizza Dough
We’ve extensively tested a gluten-free variation of this recipe, and we’re thrilled to report that it works beautifully with a few simple adjustments!
- Texture Note: It’s important to be aware that gluten-free Greek yogurt dough will naturally be a bit more brittle than dough made with traditional wheat flour. This is due to the lack of gluten, which provides elasticity.
- Gentle Handling: When shaping the dough, use very gentle hands. If any cracks appear, simply “heal” them by gently pressing the dough back together. Take your time during this step to ensure a sturdy crust.
- Precision is Key: For the most consistent and best results, we highly recommend weighing your gluten-free flour and Greek yogurt. Gluten-free flours can vary significantly in how much moisture they absorb, so weighing ensures accuracy.
- Specific Measurements: You will need approximately 192 grams of a high-quality gluten-free baking mix (we’ve had great success with Bob’s Red Mill 1-to-1 Gluten-Free Baking Flour), which is roughly equivalent to 1 cup + 3 tablespoons. Pair this with 245 grams of plain Greek yogurt, or about 1 cup. These specific ratios help achieve the best texture for a gluten-free crust.

Air Fryer Instructions for Personal-Sized Greek Yogurt Pizzas
For those who love the convenience of an air fryer, this Greek yogurt pizza dough adapts beautifully! To fit most standard air fryers, you’ll need to divide the dough into smaller portions. You can either make one single small pizza or make the full recipe and split the dough in half for two individual-sized pizzas.
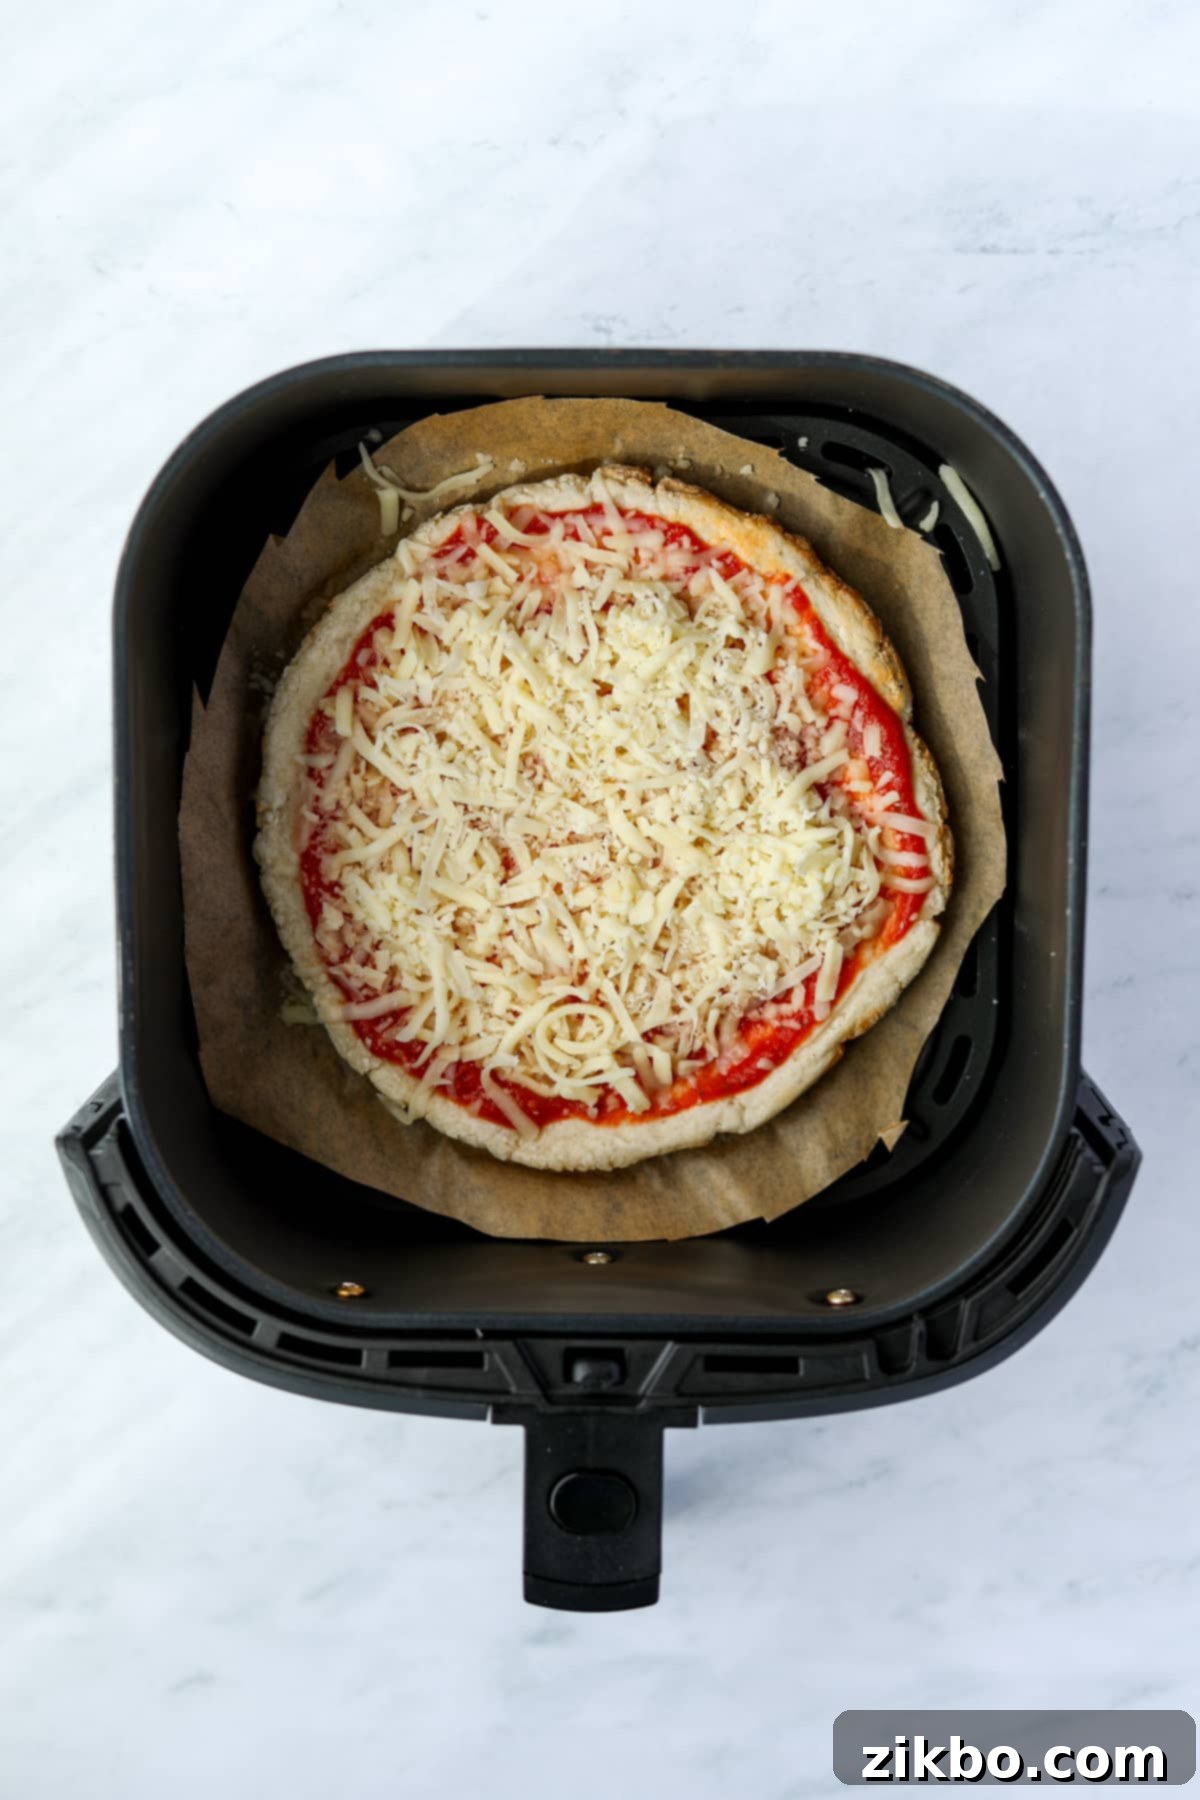
- Shape & Pre-bake: Take one half of the dough and shape it into a 6-7 inch circle. Line your air fryer basket with a piece of parchment paper cut to size. Preheat your air fryer to 370ºF (188ºC) and cook the crust for 7 minutes.
- Flip & Top: After 7 minutes, carefully remove the dough from the air fryer and flip it over. Top the pre-baked crust with 2-3 tablespoons of your favorite pizza sauce, a generous sprinkle of shredded cheese, and your chosen toppings.
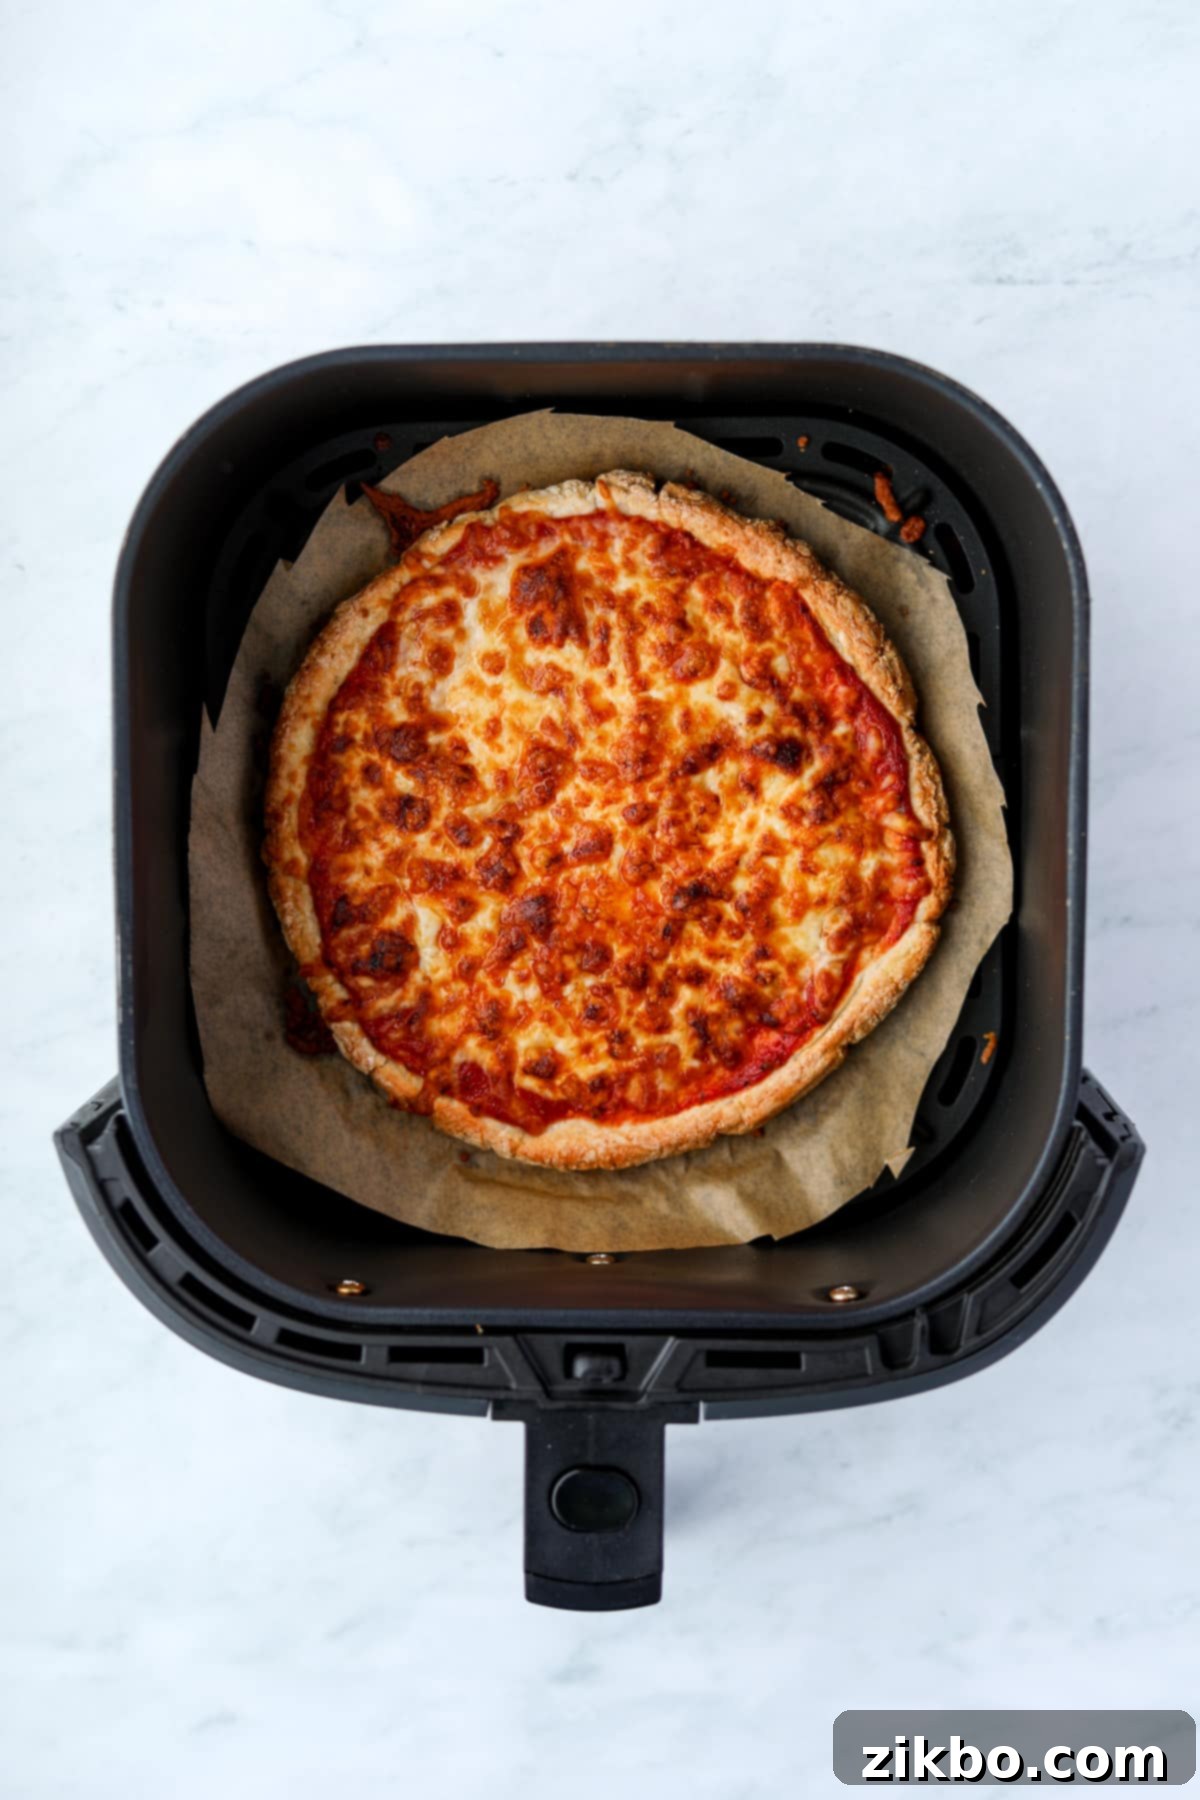
- Final Air Fry: Return the topped pizza to the 370ºF (188ºC) air fryer. Cook for an additional 6-8 minutes, or until the cheese is melted, bubbly, and the crust is golden brown. Cooking times may vary slightly depending on your air fryer model.
- Cool & Serve: Carefully remove the pizza from the air fryer using the parchment paper. Allow it to cool for 3-5 minutes before slicing and serving. This resting period allows the toppings to set and prevents burns.
Expert Tips for Greek Yogurt Pizza Perfection
- Always Weigh Your Flour and Yogurt (If Possible): While cup measurements are provided, for the most consistent and professional results, we highly recommend using a kitchen scale to weigh your flour and Greek yogurt. This eliminates variations that can occur with volume measurements, especially critical for achieving the perfect dough consistency.
- Embrace Disposable Gloves: Working with this dough can be a bit sticky, especially during the initial mixing and shaping. Wearing a pair of disposable food prep gloves is a total lifesaver! It keeps your hands clean and makes the process much more enjoyable.
- Hand-Shape, Don’t Roll: This particular dough recipe performs best when shaped with your hands. A rolling pin tends to stick to the Greek yogurt dough, leading to frustration and an uneven crust. Use your palms and fingertips to gently press and stretch the dough into your desired shape.
- Don’t Skip the Crust Flip: This is our number one secret to achieving a superior Greek yogurt pizza! Flipping the partially baked crust over before adding your toppings prevents the pizza sauce from soaking into the dough, ensuring a wonderfully crispy bottom and a texture that truly rivals classic homemade pizza dough. It’s a small step that makes a monumental difference!
- Preheat Your Pizza Stone/Baking Sheet: For an even crispier crust, place your pizza stone or baking sheet in the oven while it preheats. This allows the dough to hit a hot surface immediately, promoting a quicker, more even bake and a fantastic crispy bottom.
- Customize Your Crust Flavor: Don’t limit yourself to just garlic powder! Consider adding a pinch of dried oregano, Italian seasoning, or even a touch of onion powder to your dry ingredients for an extra layer of flavor in the crust itself.
- Avoid Overloading Toppings: While it’s tempting to pile on all your favorite toppings, too many can weigh down the crust and lead to uneven cooking. Aim for a balanced distribution for optimal results.
More Delicious Greek Yogurt Recipes
If you love the versatility and health benefits of Greek yogurt, you’re in luck! Here are some other fantastic recipes featuring this powerhouse ingredient:
- Greek Yogurt Ranch (Dip and Dressing)
- Greek Yogurt Chicken
- Strawberry Cheesecake Yogurt Bowl
- Greek Yogurt Protein Dip
Recipe Card: Greek Yogurt Pizza

Greek Yogurt Pizza
This Greek yogurt pizza dough is high in protein, has no rising time, and is made without a stand mixer. It’s quick, easy, and SO GOOD!
Course: Dinner, Main Course, Main Dishes
Cuisine: American, Italian
Prep Time: 10 minutes
Cook Time: 22 minutes
Total Time: 32 minutes
Servings: 6 slices
Calories: 204kcal
Author: Dorothy Bigelow
Ingredients
Greek yogurt dough:
- 1 cup Greek yogurt* (245g)
- 1 ¼ cup all-purpose flour (189g) (or gluten-free flour**)
- 2 teaspoons baking powder
- 1 teaspoon salt
- ½ teaspoon granulated garlic powder (optional)
For the pizza:
- ⅓ cup pizza sauce
- 1 ½ cups shredded cheese (mozzarella or pre-shredded blend)
- Toppings of choice (pepperoni, mushrooms, etc)
Instructions
- Preheat the oven to 425ºF (220ºC) and prepare a large broiler-safe baking pan or baking stone.
- Measure or weigh out the flour, baking powder, salt, and garlic powder (optional). Whisk well to combine.
- Add the Greek yogurt to the bowl of dry ingredients.
- Slowly begin to combine the ingredients using a silicone spatula until you have large lumps. It is difficult to fully combine using utensils and tools, so next, I recommend using a clean or gloved hand to gently work the lumps and flour together into a solid mass.
- Knead gently in the bowl until the ball is smooth and comes together. Continue to knead until the dough absorbs the flour.
- Form the dough into a round ball and place it on a large sheet of parchment paper.
- Press the dough into a flat circle using your hands and/or a rolling pin, continuing until a smooth circle about 9 ½ -10” in diameter is formed. The dough should be about ¼-⅓” thick. Note: If the dough is very sticky, dust it lightly with additional flour OR place an additional sheet of parchment on top and press or roll the dough on top of that.
- The parchment paper will wrinkle as the dough is spread out; this can be fixed by gently picking up the dough and smoothing out the parchment before setting the circle of dough down again.
- Transfer the rolled pizza crust to a large baking pan or baking stone and bake in the preheated oven for 10 minutes.
- Once the 10 minutes are up, remove the baking pan and carefully flip the half-baked dough over completely.
- Top the pizza crust with the pizza sauce, shredded cheese, and toppings of your choice.
- Return to the oven for an additional 10-12 minutes, or until the cheese is melted and the edges of the crust are beginning to brown.
- Optional: Switch the oven to “BROIL” and cook for an additional 1-3 minutes or until the cheese is bubbly and browned. Watch it carefully! (Note: Only do this step if your baking pan or pizza stone is broiler-safe)
- Carefully remove the pizza from the oven and cool for 2-5 minutes before slicing. Garnish with grated parmesan cheese, fresh basil, hot honey, or additions of your choice (optional).
Notes
- *Greek yogurt: I’ve tested this recipe with all kinds of options, including alternatives like Skyr. My top recommendation is to use Greek yogurt with some fat content, as that helps improve the texture of the dough and allows some browning, which closely resembles traditional pizza. That being said, we’ve still had great results using fat-free Greek yogurt!
- **Gluten free: I’ve tested this recipe using Bob’s Red Mill gluten-free flour, and it works well, although the dough is a little more brittle (and so you will need to be more careful when rolling it out). Because of the brittle dough, I recommend making two smaller pizzas (split the dough in half and roll each to about 6-7” in diameter). It needs a tad less flour in my experience: about 1 cup + 3 tablespoons (192g). It works best if the yogurt and flour are measured by weight.
- Air Fryer: Divide the dough into two smaller pizzas (or cut the recipe in half). Roll each circle to about 6-7 ½” and cut the parchment to the size of the air fryer. Preheat to 370ºF (188ºC) and cook for about 7 minutes, then flip, add sauce, cheese and toppings, and cook for another 6-8 minutes, or until browned and bubbly. Repeat with the second pizza (if using).
- Personal pan size: The recipe can be cut in half and prepared either in the oven or air fryer as directed.
- Self-rising flour: If you have self-rising flour on hand, you can use that instead of all-purpose. Just omit the baking powder and salt listed in the recipe.
Nutrition
Serving: 1 slice | Calories: 204kcal | Carbohydrates: 23g | Protein: 13g | Fat: 7g | Saturated Fat: 4g | Polyunsaturated Fat: 0.3g | Monounsaturated Fat: 2g | Trans Fat: 0.002g | Cholesterol: 24mg | Sodium: 782mg | Potassium: 140mg | Fiber: 1g | Sugar: 2g | Vitamin A: 250IU | Vitamin C: 1mg | Calcium: 263mg | Iron: 2mg
If you loved this recipe for Greek Yogurt Pizza, let me know by leaving a 5-star review in the recipe card or comment below! You can also tag me on Instagram @dashfordinner.
Please note that some of my blog posts here at Dash for Dinner may contain affiliate links. If you make a purchase through these links, I will get a small commission at no additional cost to you. Please see my Disclaimer for more information.
