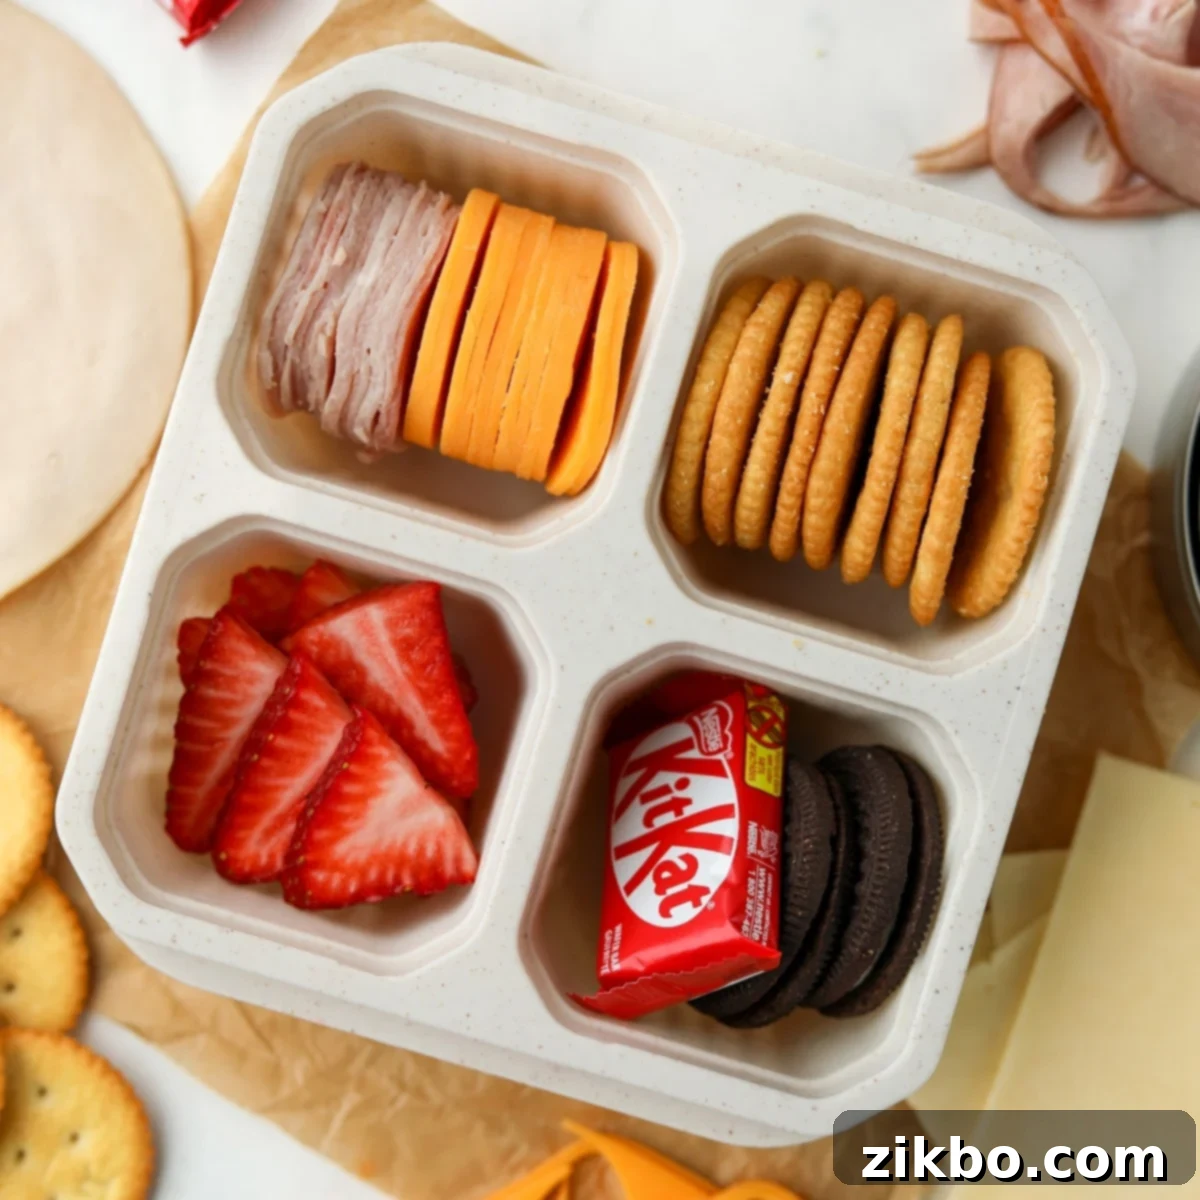
The Ultimate Guide to Homemade Lunchables: Easy & Healthy DIY Recipes for Kids & Adults
Tired of expensive, pre-packaged lunch options that often lack fresh ingredients and real nutritional value? This comprehensive guide to crafting homemade Lunchables is your ultimate solution! We’ll explore how to recreate all the beloved classic flavors, from cheesy crackers to delightful pizza and nachos, and even introduce a sophisticated “Adult” version that feels incredibly gourmet.
Creating your own DIY Lunchables isn’t just a fun, creative project; it’s a smart and efficient way to streamline your meal prep for the entire week. Imagine a fridge stocked with convenient, grab-and-go lunch options, perfect for busy school days, productive work-from-home sessions, exciting road trips, or simply a quick, healthy bite when hunger strikes. Say goodbye to monotonous, store-bought lunches and hello to delicious, customizable, and budget-friendly meals that truly satisfy!
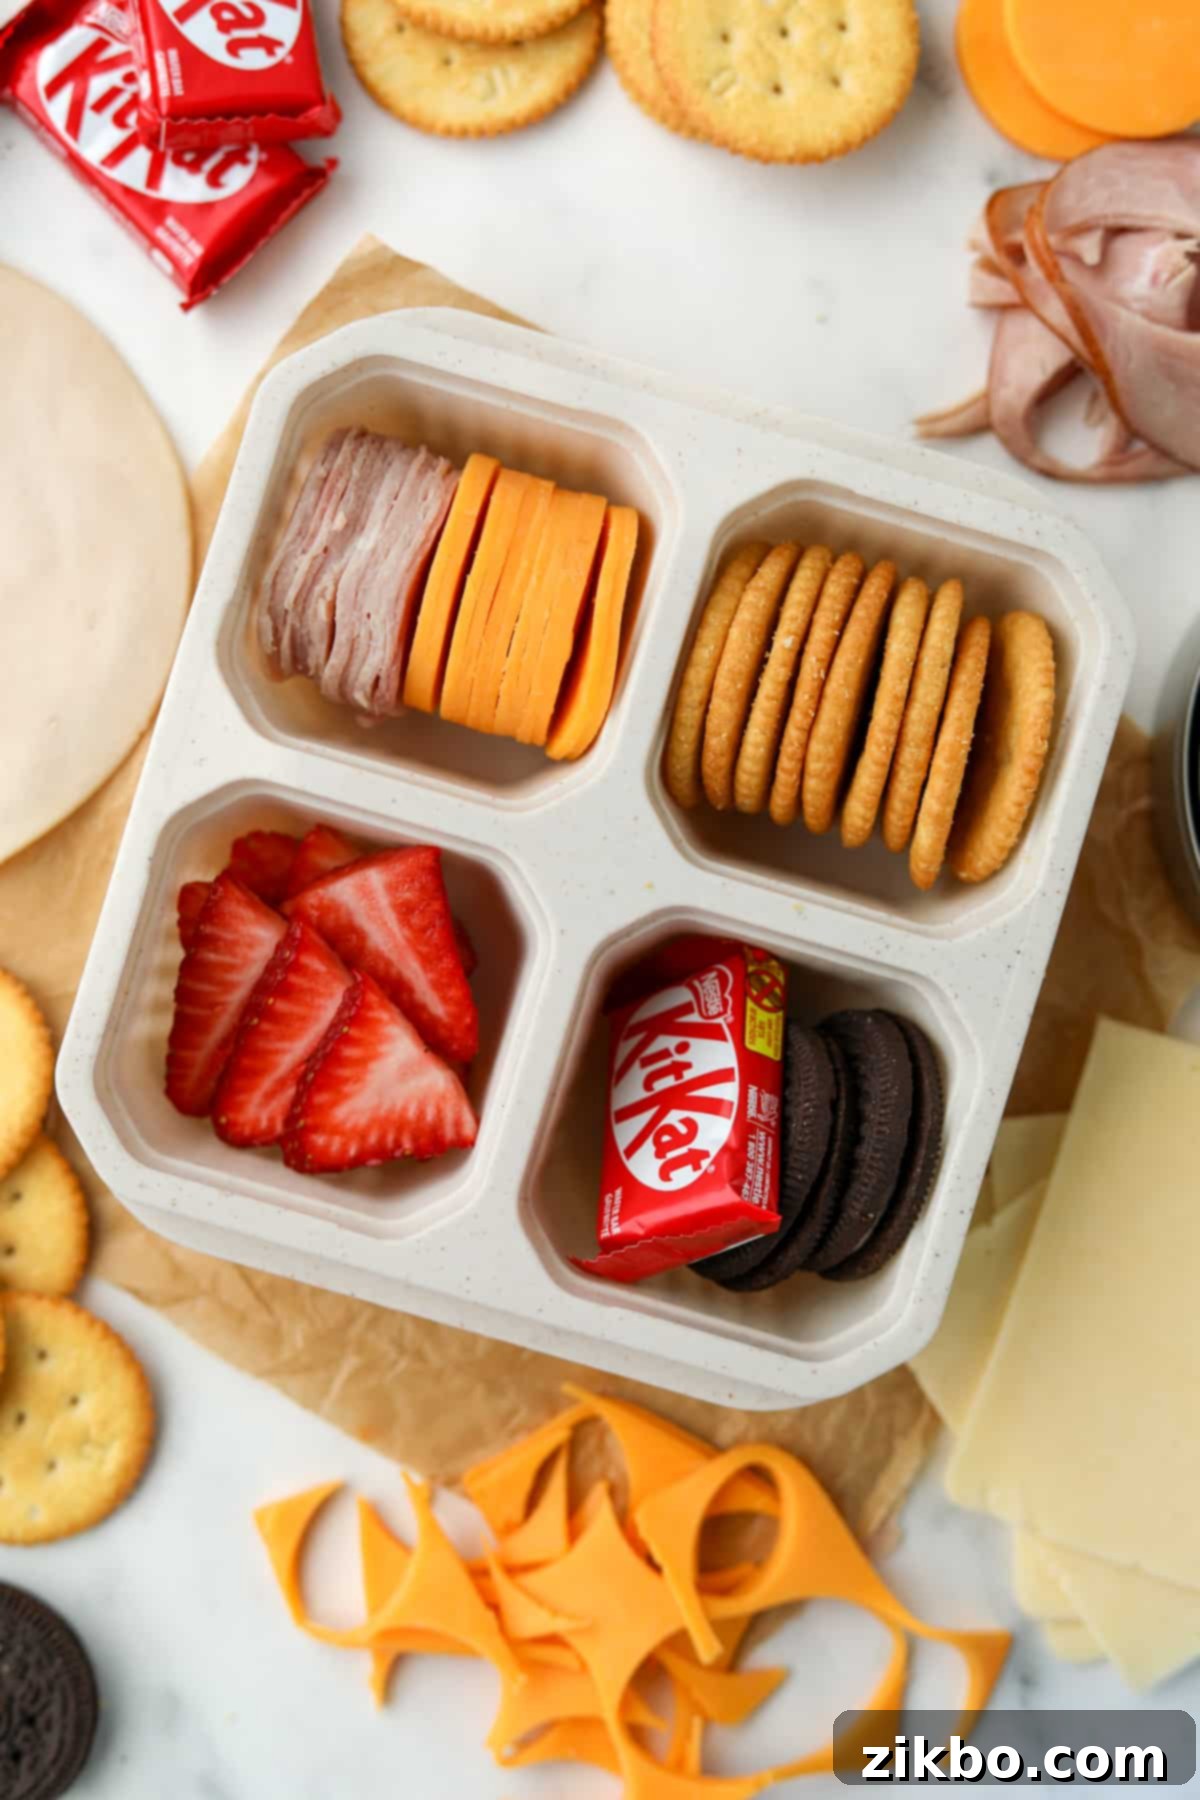
Like many busy individuals and parents, I frequently found myself questioning if there was a better alternative to buying those familiar store-brand Lunchables. While their sheer convenience for quick meals, school lunches, and travel is undeniable, their often-high price tag, questionable ingredients, and excessive packaging can be a significant deterrent. That’s when I enthusiastically ventured into the rewarding world of making them myself.
My culinary experiments quickly proved incredibly rewarding and surprisingly simple! Not only are these DIY versions remarkably easy to assemble, but they genuinely taste superior to anything you’ll find pre-packaged. By using your preferred high-quality crackers (my personal favorites include classic buttery Ritz or sophisticated Raincoast Crisps for an “adult” touch), you can craft an effortlessly delicious and healthy lunch that’s perfectly suited for make-ahead meal prep. The secret is out: homemade is simply better, healthier, and more enjoyable!
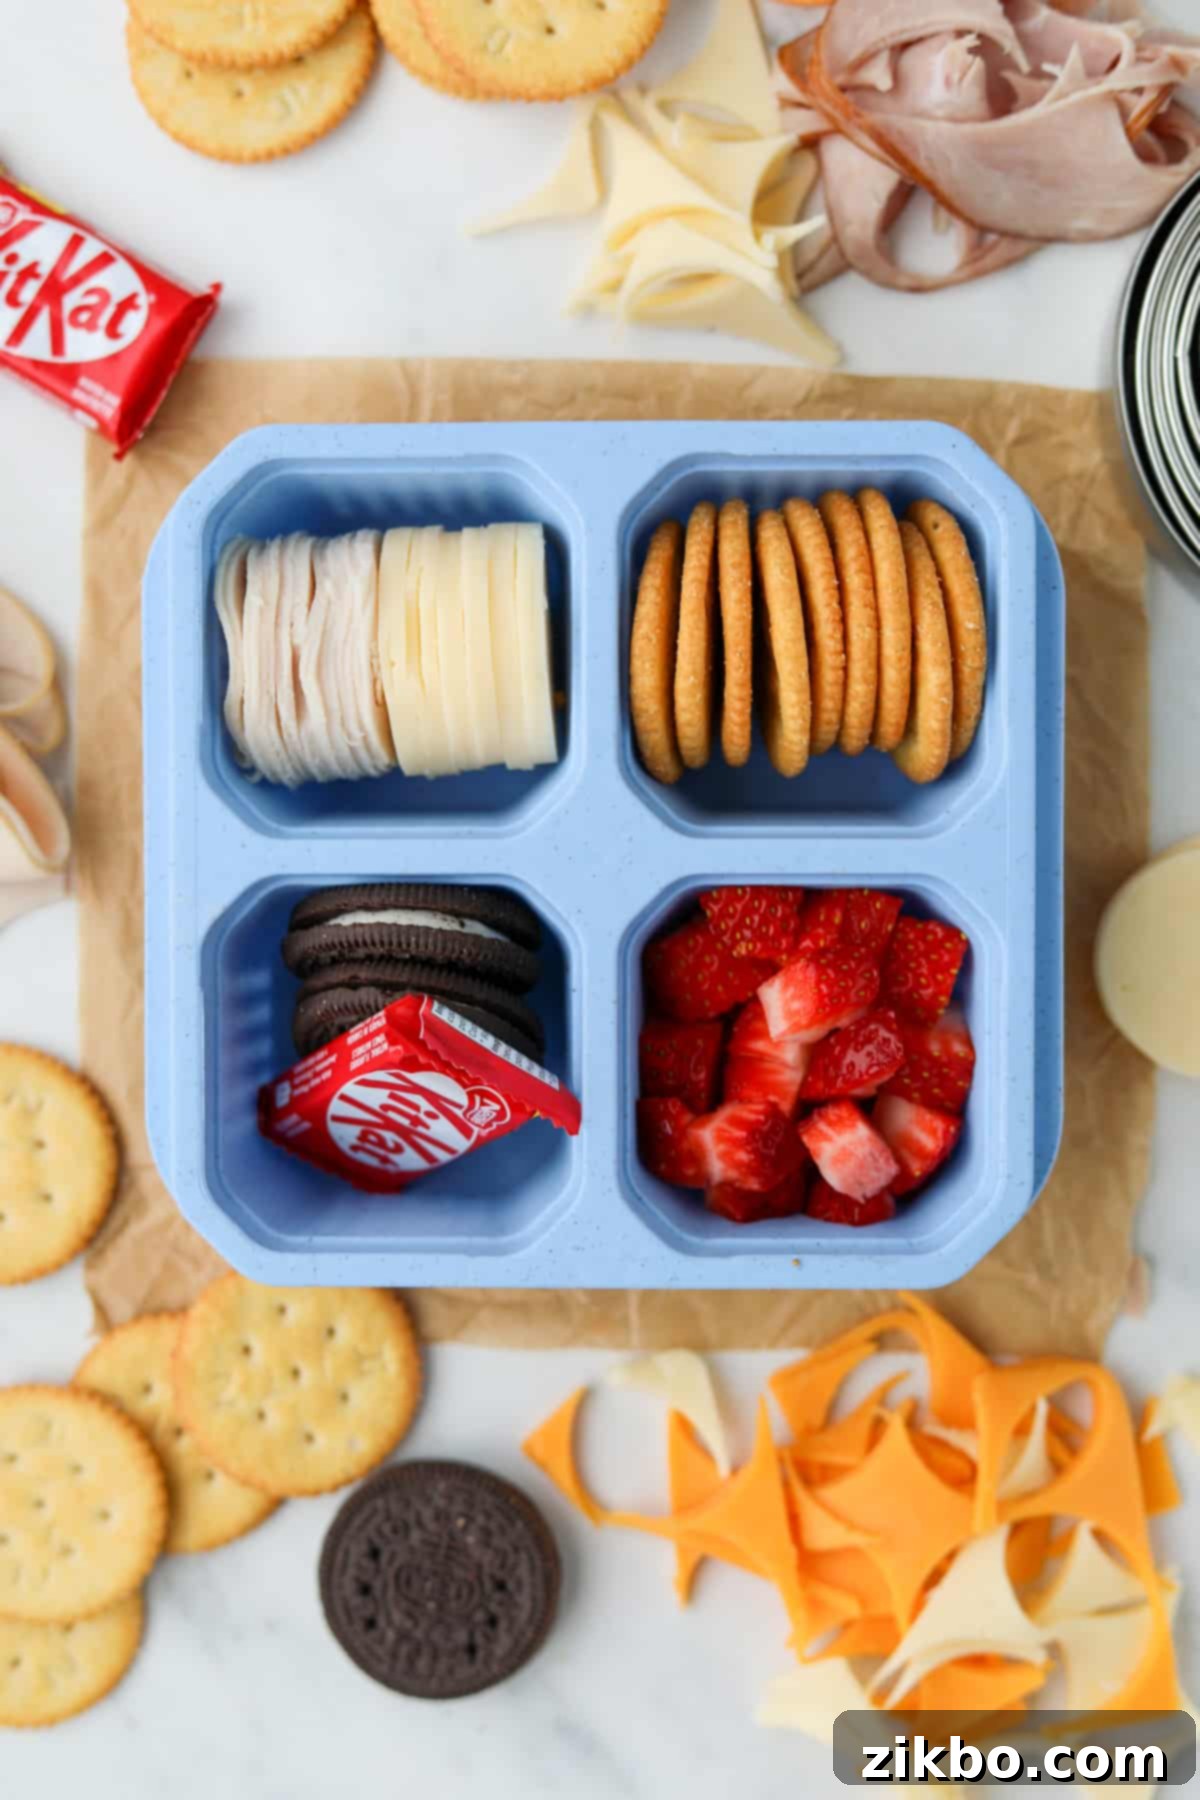
To replicate that iconic Lunchables look and feel, I initially invested in some 4-section lunch containers available on Amazon. However, don’t feel limited by this! Any sectioned lunch box, bento box, or even separate small containers you already own will work perfectly to keep your ingredients neatly organized and fresh until it’s time to eat. The key is separation to prevent sogginess and maintain distinct flavors.
Why You’ll Love Making Your Own DIY Lunchables:
- Significant Cost Savings: The financial benefits of homemade Lunchables are truly substantial. Crafting your own versions dramatically reduces the cost per serving compared to their store-bought counterparts, saving you money week after week. This makes healthy, convenient eating more accessible for families and individuals on a budget.
- Superior Taste and Quality: When you’re in charge of the ingredients, you gain the power to select the freshest, highest-quality components available. This means choosing premium deli meats, artisanal cheeses, organic fruits and vegetables, and your favorite gourmet crackers, resulting in a far more delicious and satisfying lunch experience every time.
- Unmatched Customization and Health Benefits: This is where homemade truly shines. Easily tailor each lunchable to specific dietary needs, preferences, or allergies. Whether you require gluten-free crackers, dairy-free cheese alternatives, vegetarian protein sources, or want to sneak in extra veggies, the possibilities are endless. Plus, you can avoid artificial preservatives, excessive sodium, and added sugars often found in pre-packaged meals, making them a much healthier choice.
- Reduced Waste & Eco-Friendly: Opting for reusable lunch containers over single-use plastic packaging is a fantastic and impactful step towards a more sustainable lifestyle. It’s not only better for your wallet in the long run but also significantly better for the environment by reducing landfill waste.
- Fun & Engaging for All Ages: Involve your kids in the assembly process! Children are far more likely to eat and enjoy a lunch they helped create and customize. For adults, it’s a wonderfully creative outlet to experiment with gourmet combinations and elevate your midday meal from mundane to magnificent.
Essential Ingredients for Your Creative Homemade Lunchables:
The beauty of DIY Lunchables lies in their incredible versatility. The specific ingredients you choose will depend entirely on the delicious variety you’re preparing – let your imagination run wild!
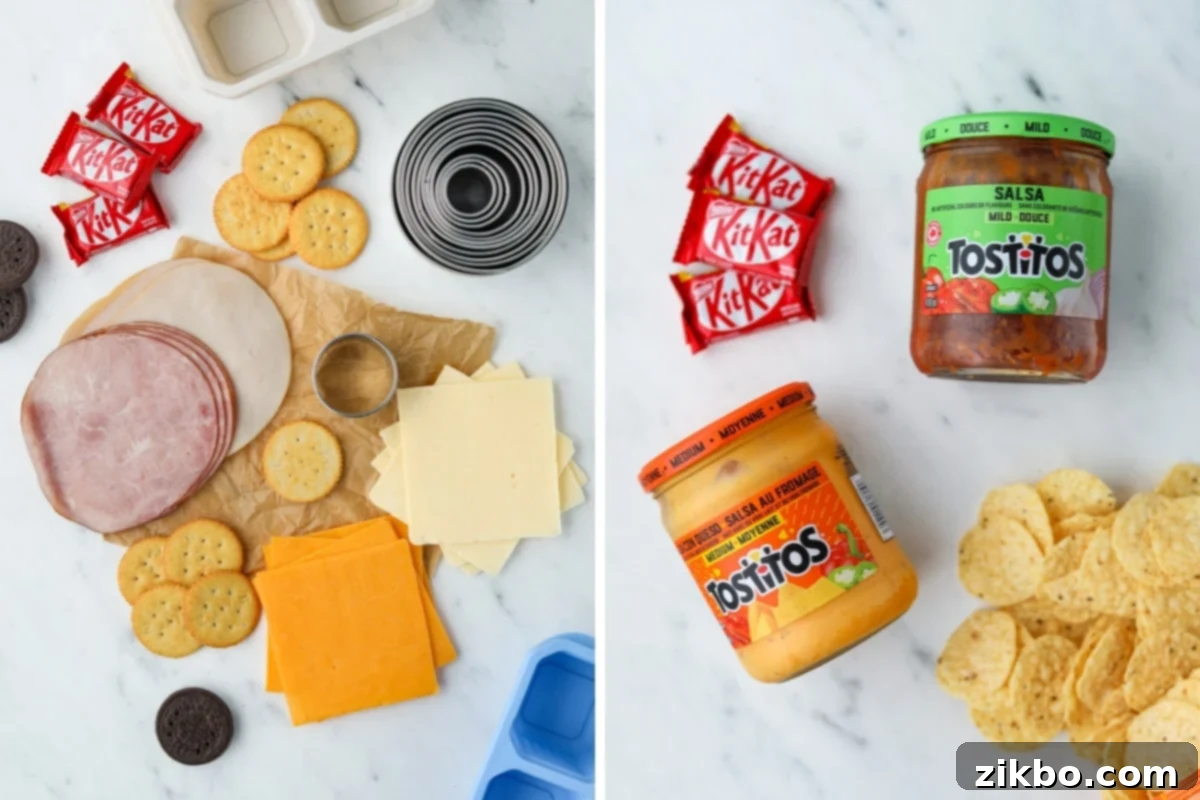
Classic Meat & Cheese Lunchable:
- Sliced Deli Meat: Opt for high-quality, freshly sliced turkey, ham, chicken, or even lean roast beef. Look for low-sodium or nitrate-free options for a healthier choice.
- Sliced Cheese: Versatile and delicious options include cheddar, Swiss, havarti, provolone, or mozzarella. Choose your family’s favorite, or mix and match for exciting flavor combinations.
- Crackers: Your choice of crackers is paramount for the classic experience! Ritz, Club, or even whole-wheat and multi-grain crackers are excellent for a traditional feel.
- Sweet Treat: A small chocolate square, a mini cookie, or a few colorful gummy bears add that cherished classic Lunchables touch.
- Optional Fresh Additions: Grapes, apple slices, baby carrots, or crisp cucumber rounds for extra nutrition and crunch.
DIY Nacho Lunchables:
- Tortilla Chip Rounds: Small, sturdy tortilla rounds are absolutely ideal as they fit perfectly into container sections and are less prone to breaking during transport.
- Creamy Queso: A good quality jarred queso provides that authentic, comforting nacho flavor. For an even fresher taste, you can easily make your own homemade queso.
- Fresh Salsa: Mild or medium salsa adds a fresh, zesty kick. Consider including a small container of homemade or store-bought guacamole for an extra layer of flavor.
- Sweet Treat of Choice: A little something sweet to provide a delightful balance to the savory and spicy notes.
- Optional Toppings: A tiny container of seasoned black beans, sweet corn, or shredded lettuce can elevate this nacho experience even further.
Homemade Pizza Lunchables:
- Sturdy Wide Crackers or Mini Bases: Water crackers, pita crisps, or even mini bagels or English muffin halves make excellent, durable pizza bases that hold up well.
- Flavorful Pizza Sauce: A high-quality jarred pizza sauce is wonderfully convenient. Alternatively, use marinara or pesto for a unique and delicious twist.
- Shredded Cheese: Classic mozzarella is always a winner, but a blend of Italian cheeses (like provolone and parmesan) works wonderfully for added depth of flavor.
- Sweet Treat: A sweet finish is always a welcome addition, completing the meal.
- Optional Toppings: Mini pepperonis, finely diced bell peppers, or black olives stored in a small separate container for a fun, interactive assembly.
Gourmet “Adult” Lunchables (Charcuterie Style):
- Artisan Crackers: Elevate your experience with sophisticated crackers like Raincoast Crisps, fig and olive crisps, or hearty multi-grain varieties that complement rich flavors.
- Charcuterie-Style Meats: Indulge in thinly sliced prosciutto, savory salami, spicy sopressata, or gourmet smoked turkey breast for a truly sophisticated touch.
- Premium Sliced Cheese: Select from creamy goat cheese, luxurious brie, sharp aged cheddar, or a flavorful havarti to pair perfectly with your meats and crackers.
- Mixed Nuts, Dried Fruit, or Fresh Berries: A small handful of high-quality almonds, walnuts, dried cranberries, or fresh grapes/strawberries adds texture, sweetness, and healthy fats.
- Optional Extras: Olives, cornichons, a dollop of fig jam, or a small portion of savory hummus for an added layer of gourmet appeal.
Recommended Equipment for Effortless Assembly
Having the right tools at hand makes the process of preparing your DIY Lunchables even quicker and more enjoyable. These items aren’t strictly necessary for every variation, but they certainly streamline the prep work and enhance the presentation:
- Sectioned Lunch Containers: Investing in good quality, reusable 3 or 4-section lunch containers is highly recommended. They are crucial for keeping individual ingredients separate, preventing moisture transfer, and ensuring everything stays fresh, crisp, and appealing until lunchtime.
- Circular Cutter Set: This handy tool is a game-changer for creating perfectly sized meat and cheese rounds that fit neatly on your crackers. It gives your homemade Lunchables that professional, uniform, and aesthetically pleasing look. If you don’t have one, don’t worry – sharp kitchen scissors and a parchment paper template work just as effectively!
Step-by-Step Guide: How to Assemble Your Homemade Lunchables
Preparing your DIY Lunchables is a straightforward and rewarding process, especially when you have a clear plan. Follow these easy steps to create delightful, nutritious, and convenient meals for the week ahead.
For the Classic “Cheese and Crackers” & “Adult” Styles:
These two popular varieties share a similar foundational prep method for their main components, focusing on neatness and appealing presentation.
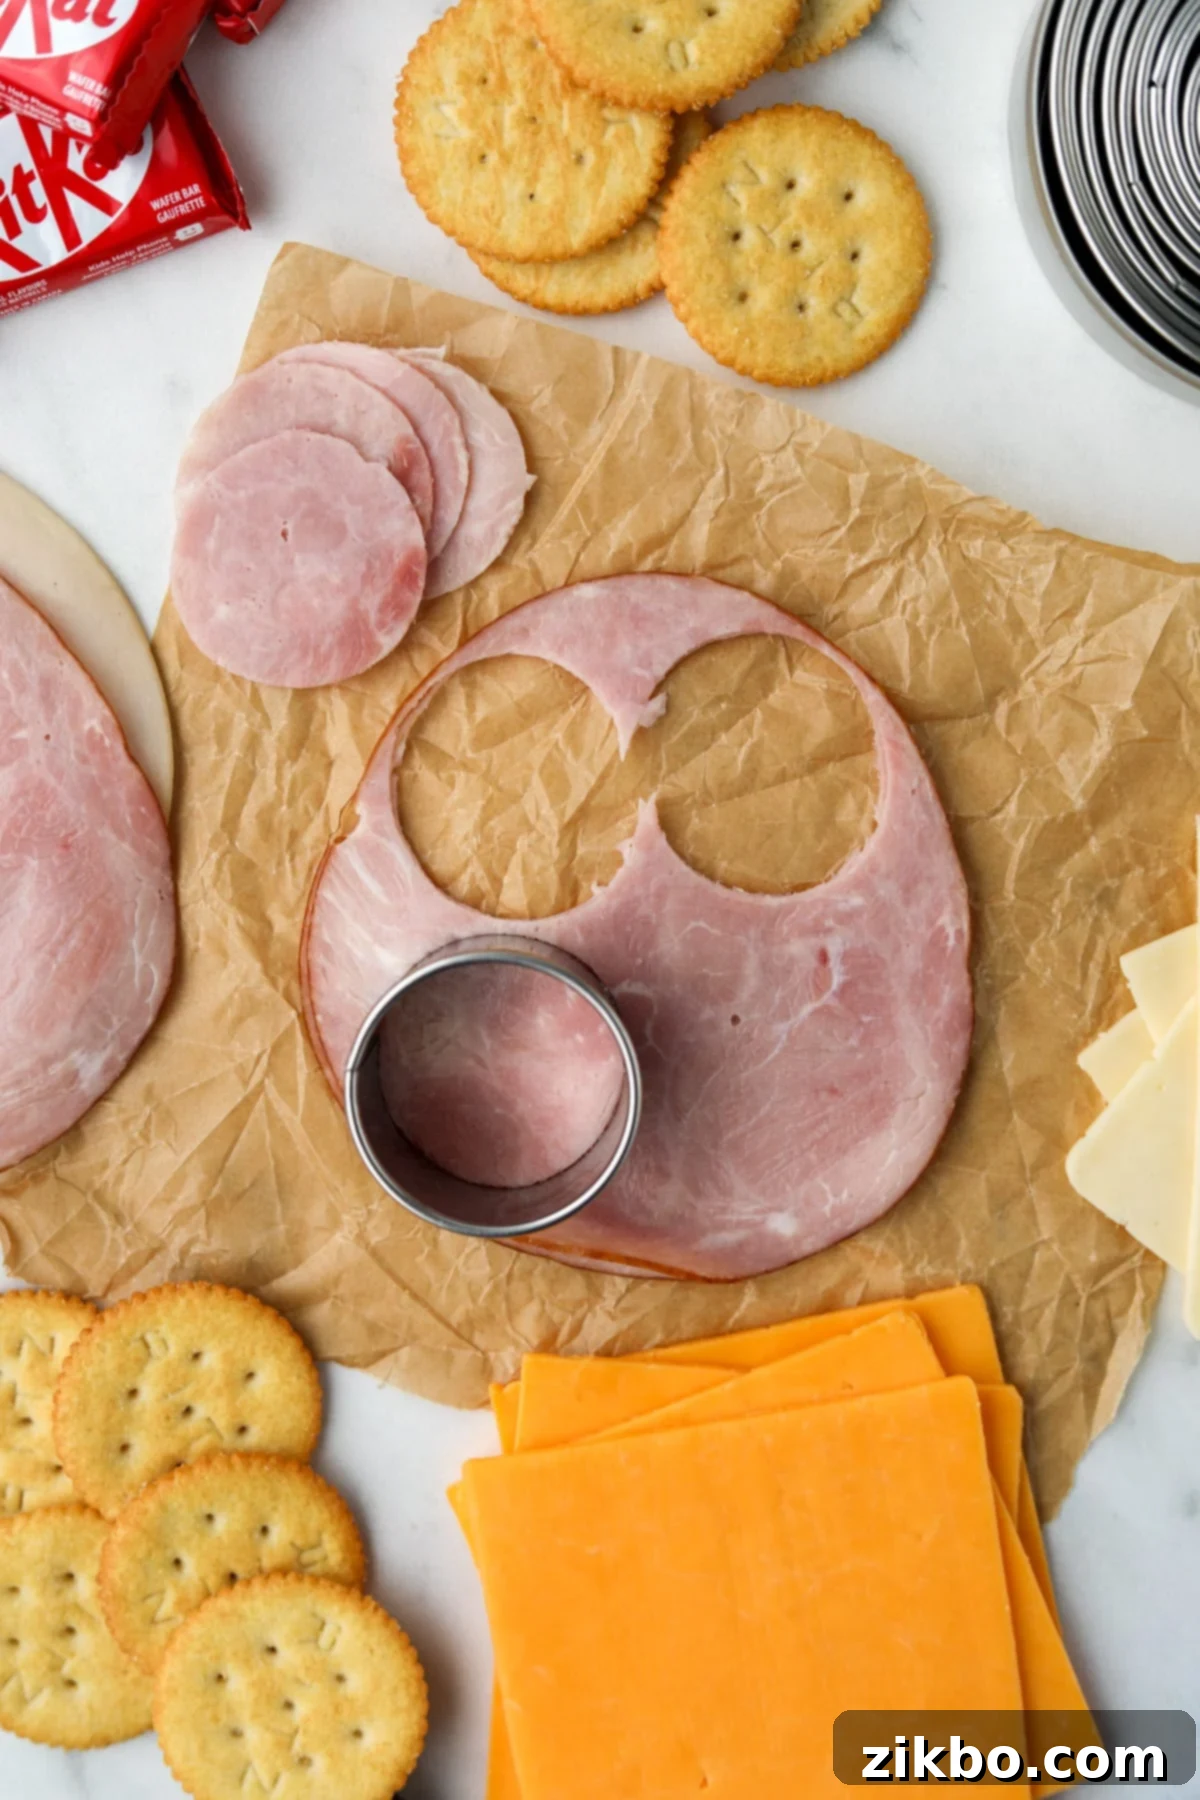
- Step One: Perfectly Prepare Your Meat (If Using)
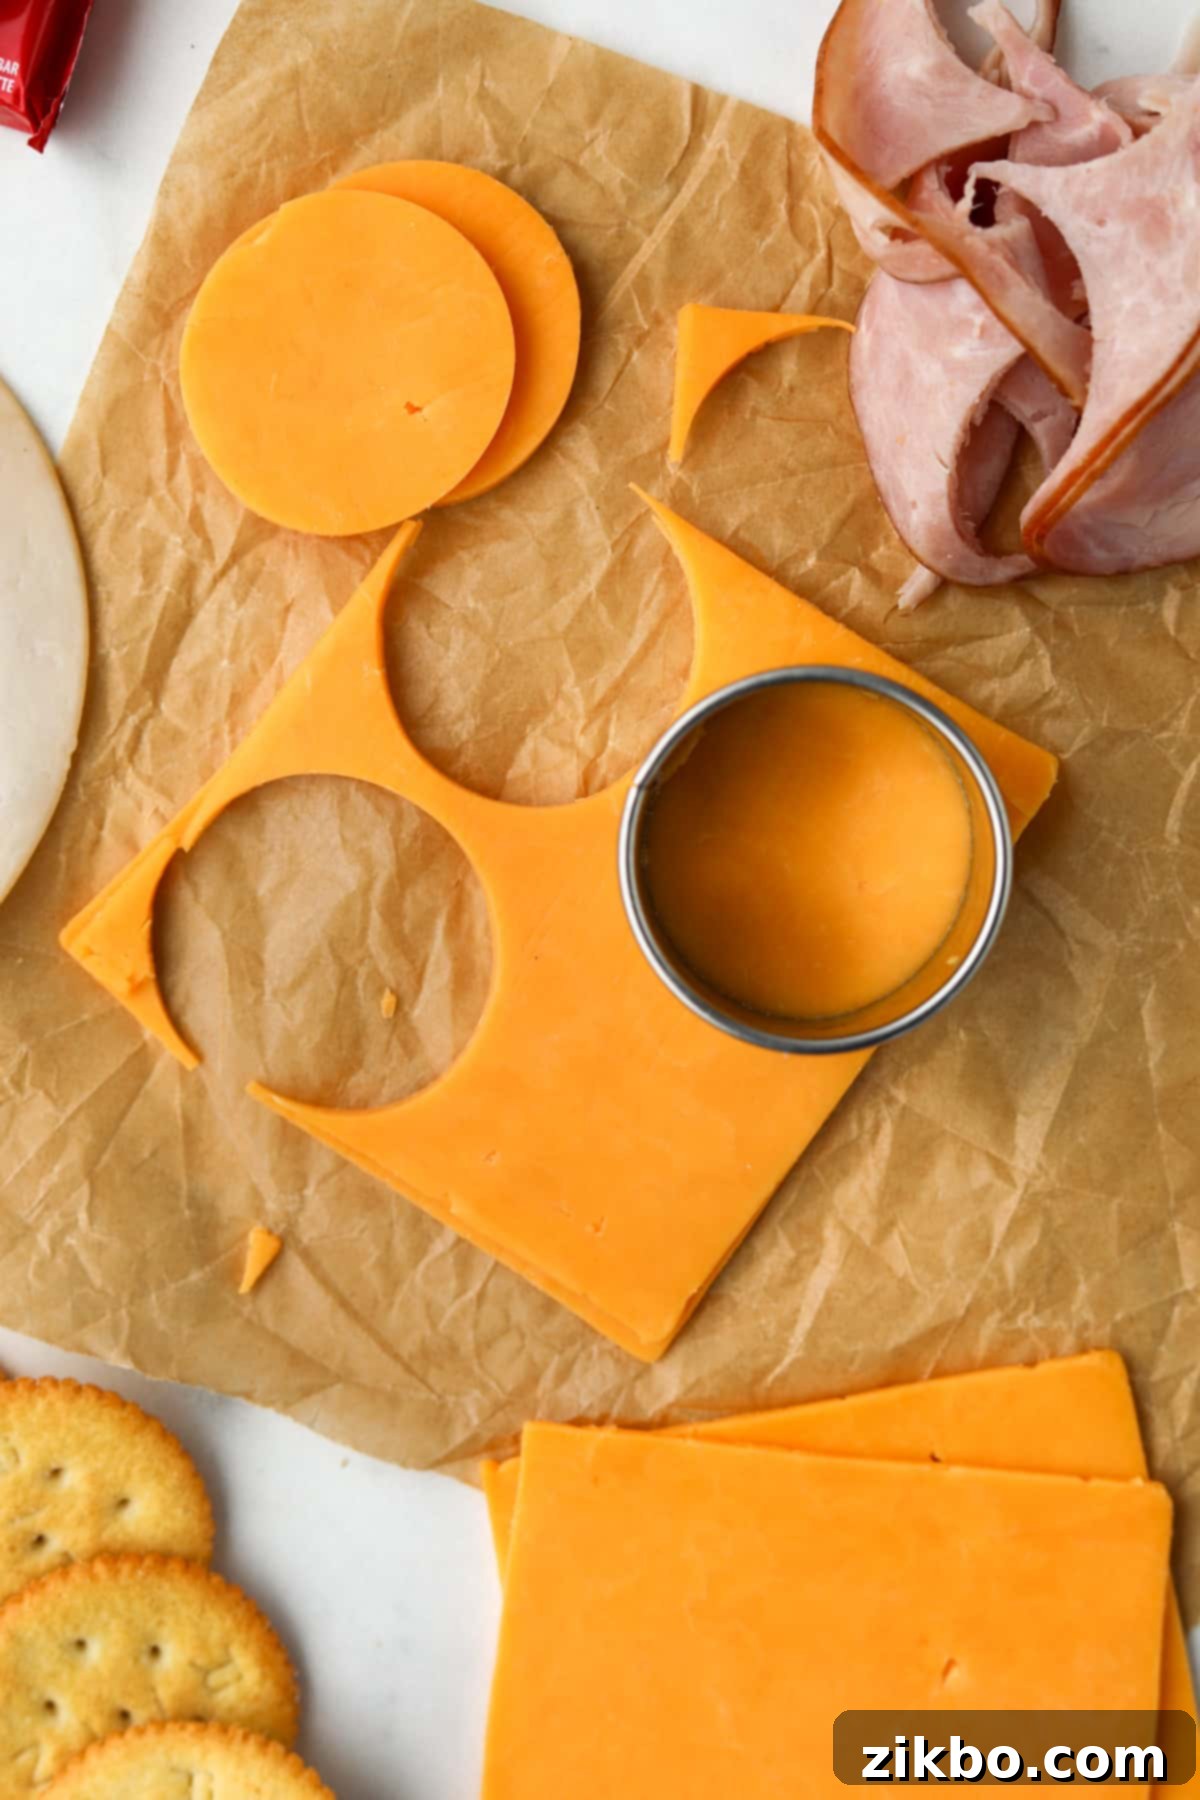
- To achieve that signature, clean Lunchables look, select a circular cutter that closely matches the size and shape of the crackers you intend to use. This creates a uniform bite.
- Carefully place a slice of your chosen deli meat (such as ham, turkey, chicken, or salami) onto a clean cutting surface or a cutting board. Press the circular cutter firmly into the meat to create as many perfect rounds as possible from each individual slice.
- Repeat this process until you have a sufficient number of meat circles for your desired batch of Lunchables, ensuring you have enough for all planned meals.
- Pro Tip: No circular cutters on hand? No problem at all! Simply create a small, circular template from parchment paper, place it on your deli meat, and use sharp kitchen scissors to carefully cut around the template. Remember to thoroughly wash and sanitize your scissors afterward!
- Step Two: Prepare the Cheese Rounds
- Using the exact same circular cutter you utilized for the deli meat, carefully cut your cheese slices (cheddar, provolone, havarti, brie, etc.) into perfectly matching rounds. This ensures a consistent and appealing presentation for your assembled lunchables.
- Make enough cheese rounds to generously pair with your meat and crackers for each container you are preparing.
- As with the meat, if a specialized cutter isn’t available, the parchment paper template and clean kitchen scissors method works perfectly for cutting cheese as well.
Don’t Waste the Scraps! Creative Uses for Leftover Meat and Cheese:
After carefully cutting your perfect rounds for your homemade Lunchables, you’ll inevitably have some delicious and perfectly good meat and cheese scraps left over. There’s no need to let them go to waste! These can be enjoyed immediately as a quick and satisfying snack, or cleverly repurposed into other meals. Chop them up and add them to a vibrant, hearty chopped salad (my Italian Sub Salad is a fantastic option for incorporating these!), toss them into a flavorful pasta salad, or even fold them into an omelet or scramble for a tasty and protein-packed breakfast or dinner. Get creative and minimize food waste!
Assemble Your Lunchable Containers with Precision and Care:
- Step Three: Thoughtfully Arrange and Fill Each Section
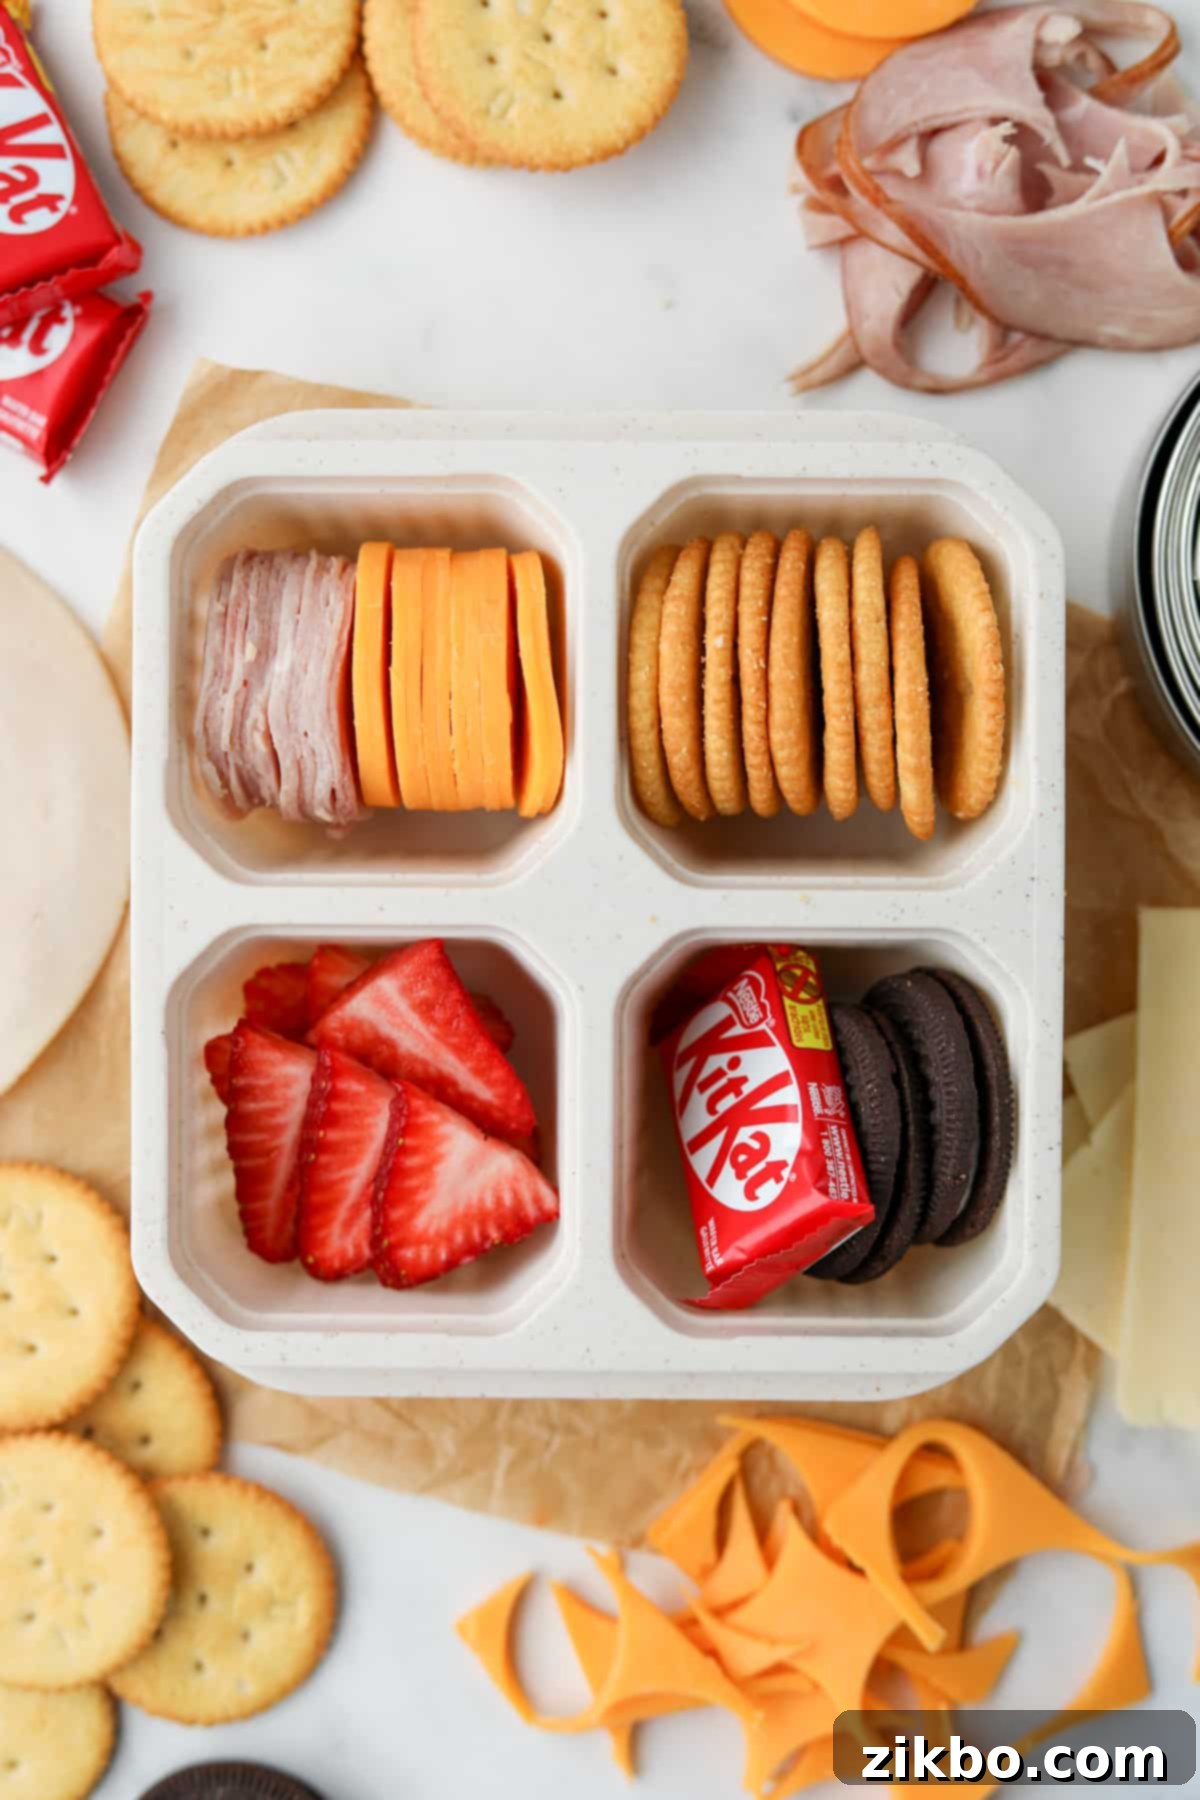
- Once your meat and cheese components are expertly prepped, it’s time for the final assembly stage. In one of the designated sections of your reusable lunch container, neatly stack the meat and cheese rounds. You can alternate them for an attractive presentation.
- In a separate, dry section, add your chosen crackers. Ensure they are laid flat or stacked carefully to prevent breakage.
- Allocate a third section for a delightful sweet treat of your choice – perhaps a small handful of fresh berries, a mini chocolate bar, a couple of small cookies, or even a few dried fruit pieces.
- If you’re utilizing a 4-section container, the final section can be filled with additional wholesome items such as more fresh fruit, a small portion of mixed nuts, or some raw veggies like crisp carrot sticks or vibrant bell pepper strips for added crunch, fiber, and nutrition.
Top Tip for an Authentic Feel: To perfectly mimic the nostalgic appeal and experience of store-bought Lunchables, we highly recommend including a few small cookies and/or a mini chocolate bar. It adds that little extra touch of joy and sweetness to the meal, making it truly special!
Explore All the Exciting Homemade Lunchable Varieties!
The fun and creativity don’t stop with just classic cheese and crackers! You can effortlessly recreate or invent a multitude of other exciting and delicious flavors right in your own kitchen. All it takes is the right selection of ingredients and a reliable sectioned lunch container to keep everything perfectly separated, fresh, and ready for enjoyment throughout the day.
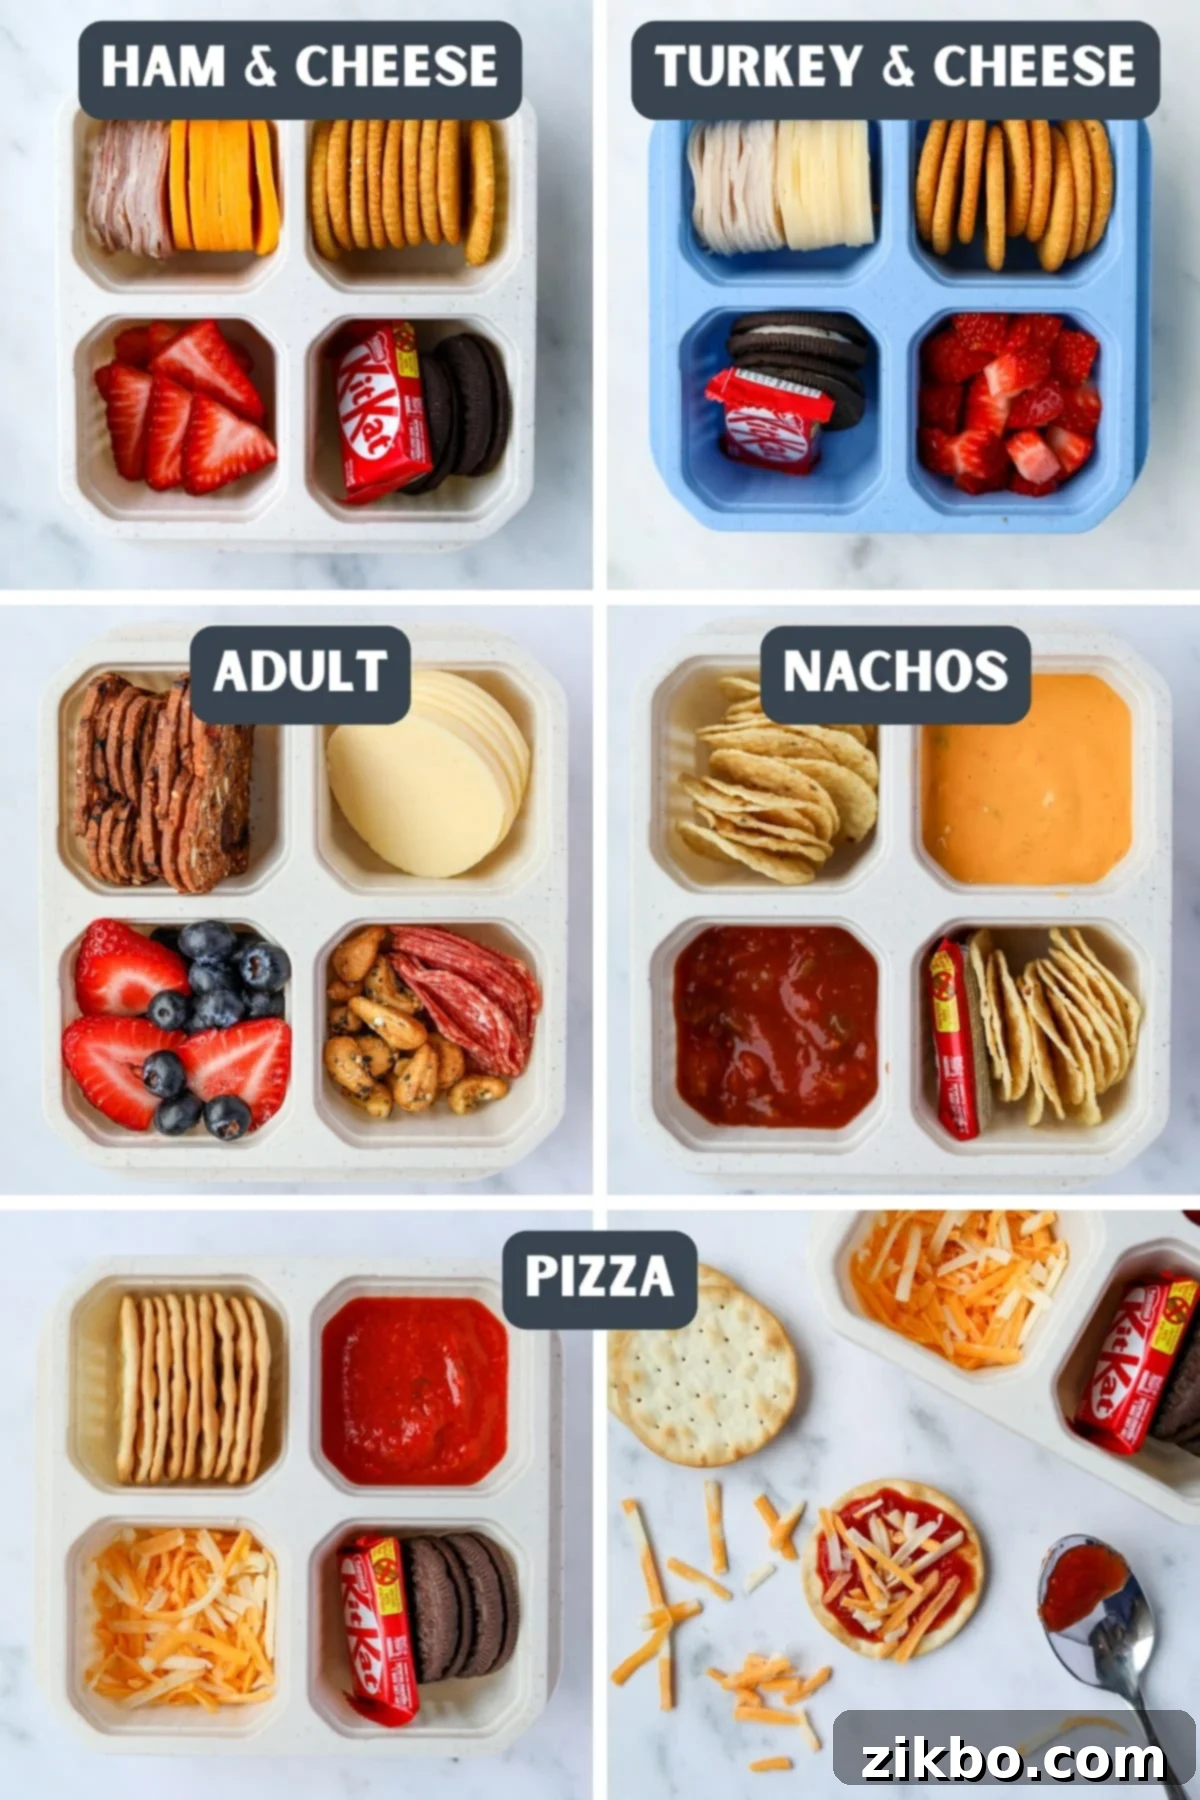
- Classic Cheese and Crackers: This timeless and universally loved favorite includes perfectly cut meat and cheese rounds, your choice of crispy, delightful crackers, and a delightful small sweet treat. It’s simple, incredibly satisfying, and always a guaranteed hit for any age!
- “Adult” Charcuterie-Inspired Lunchables: Elevate your midday meal with sophisticated selections and gourmet flavors! Imagine an assortment of high-quality charcuterie-style meats, fine, flavorful cheeses, perhaps some artisanal fruit and nut crackers (Raincoast Crisps and everything cashews are fantastic choices for this!), and a premium mix of nuts or fresh/dried fruit. It’s truly like having a mini, elegant cheese board on the go!
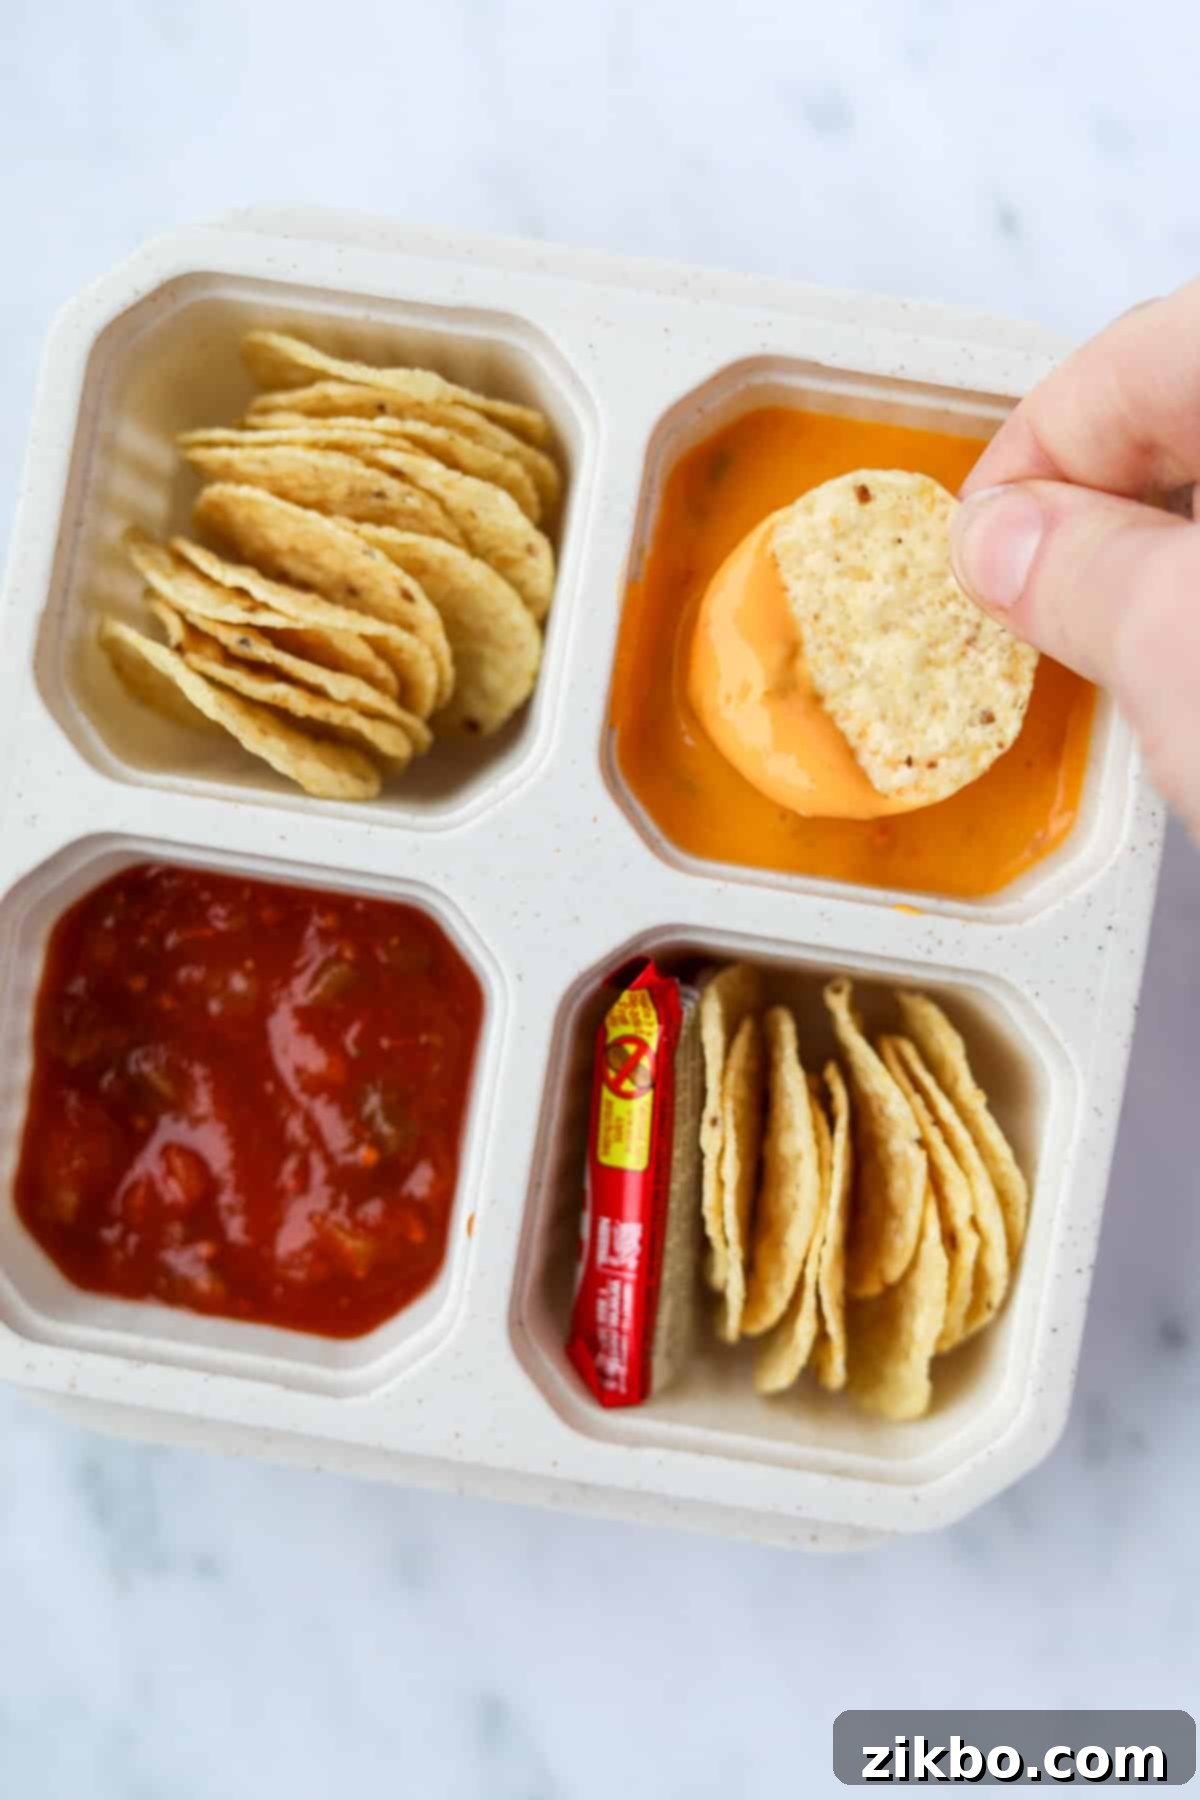
- Homemade Nacho Lunchables: Bring the vibrant fiesta atmosphere directly to your lunchbox! Fill one section with a generous portion of creamy jarred queso, another with fresh, zesty salsa, and dedicate a larger section to perfectly round tortilla chips. For an extra burst of flavor and nutrition, you can even add a small compartment of seasoned black beans, corn, or a dollop of guacamole.
- DIY Pizza Lunchables: A perennial kid (and adult!) favorite that’s easy to customize. Start with sturdy crackers (water crackers are excellent for holding toppings) or mini pitas, bagels, or even English muffin halves as your delightful pizza base. Provide a portion of rich pizza sauce, a generous sprinkle of shredded mozzarella or an Italian cheese blend, and don’t forget a sweet treat for a perfect dessert. Mini pepperoni can also be added in a small, separate container for extra fun!
- Veggie & Hummus Delight: For a lighter, incredibly healthy, and refreshing option, fill one section with creamy, savory hummus, another with an array of colorful chopped vegetables (like crisp cucumber, crunchy carrots, and vibrant bell peppers), and pair with soft pita bread or whole-wheat crackers for dipping.
- Breakfast-for-Lunchables: Get truly creative with a fun twist! Include mini pancakes or waffles, a small container of maple syrup for dipping, a hard-boiled egg for protein, and some fresh berries. This option is perfect for a fun and unexpected change of pace that’s sure to delight!
Smart Meal Prep and Storage Tips for Your Homemade Lunchables
To maximize the freshness and flavor of your delicious creations, and to ensure your DIY Lunchables are truly convenient for busy schedules, consider these essential make-ahead and storage strategies:
- Optimal Prep Time for Peak Freshness: For the best quality and taste, we strongly recommend preparing your homemade Lunchables in manageable batches that will be consumed within 2-3 days. While some individual ingredients might last slightly longer, most components maintain their prime freshness, texture, and appeal for approximately this duration. If you need lunches for an entire school or work week, consider doing a second, smaller prep session mid-week to ensure everything remains perfect.
- The Indispensable Power of Sectioned Containers: These specialized containers are far more than just aesthetically pleasing; they are absolutely crucial for maintaining food integrity! Sectioned containers effectively prevent “wet” ingredients – such as deli meats, fresh salsa, tangy pizza sauce, or juicy fresh fruit – from coming into direct contact with “dry” or crispy items like delicate crackers and crunchy chips. This physical separation is the key to avoiding soggy crackers and maintaining the intended delightful texture of each and every component in your lunchable.
- Strategic Storage for Crackers and Chips: Here’s a well-guarded secret to keeping your crunchy components perfectly crisp: whenever possible, refrain from refrigerating them. Items like crackers, tortilla chips, and pita bread tend to readily absorb moisture in the cold, damp environment of a refrigerator, often losing their delightful crunch and becoming soft or stale prematurely. For the absolute best results, store these items separately in an airtight container at room temperature and add them to your lunchable container just before you pack it for the day. However, if time is truly a constraint or for younger children, it’s perfectly fine to include them from the start; just be aware they might be slightly less crisp by lunchtime.
- Utilize Ice Packs for Safety: If you are packing these wonderful homemade Lunchables for school, work, or any outing, especially during warmer months, it is imperative to always include a small ice pack in the lunch bag. This will effectively keep all perishable items, such as deli meats, cheeses, and dairy-based dips (like queso or hummus), at a safe and cool temperature until it’s time for lunch, preventing spoilage.
- Mindful Portion Control: When filling your containers, always be mindful of appropriate portion sizes. This thoughtful approach not only aids in healthy meal planning and prevents overeating but also ensures that all ingredients fit neatly and securely into their designated sections, making for an organized and appealing meal.
More Creative & Easy Lunch Ideas for School and Beyond:
If you’re constantly seeking even more inspiration to fill those lunchboxes with delicious, homemade goodness, check out these other fantastic and easy-to-make recipes. They’re perfect companions to your DIY Lunchables and will help keep mealtime exciting and varied for everyone!
- Homemade Uncrustables
- Protein Cookie Dough Balls
- Greek Yogurt Protein Dip
- Homemade Rice Krispie Treats
We truly hope you enjoyed this comprehensive guide to crafting the perfect Homemade Lunchables! If you tried and absolutely loved this recipe, please let us know by leaving a fantastic 5-star review in the recipe card below or by sharing your thoughts and experiences in the comments section! You can also tag us on Instagram @dashfordinner – we would absolutely love to see your delicious and creative homemade Lunchable creations. Happy meal prepping!
Homemade Lunchables – Ultimate DIY Guide
Print
Pin
Rate
Equipment
-
Lunch containers 3 or 4 section, reusable for optimal freshness
-
Circular cutter set for perfectly round meats and cheeses, or parchment paper and sharp kitchen scissors*
Ingredients
Classic Cheese and Cracker Style:
- Sliced Cheese cheddar, provolone, havarti, etc. (choose your favorite)
- Deli Meat ham, turkey, chicken, or roast beef (low-sodium recommended)
- Crackers (Ritz, Club, or whole-wheat for a healthier option)
- Sweet Treat mini chocolate bar, a small cookie, or a few gummy bears
- Optional Fresh Additions sliced fruit or berries, baby carrots, cucumber rounds
Homemade Nacho Lunchables:
- Tortilla Chips (round chips are recommended for container fit and less breakage)
- Queso (jarred or homemade)
- Salsa (mild or medium, for dipping)
- Optional Sweet Treat mini chocolate bar, cookie, or fruit
Homemade Pizza Lunchables:
- Sturdy Crackers or Mini Bases water crackers, pita crisps, mini pitas, or English muffins
- Pizza Sauce (jarred or homemade marinara/pesto)
- Shredded Mozzarella or Italian Cheese Blend
- Optional Mini Pepperoni (or other small diced veggies)
- Optional Sweet Treat mini chocolate, cookies, or fruit
“Adult” Charcuterie Lunchables:
- Charcuterie Meats salami, prosciutto, sopressata, or smoked turkey breast
- Premium Sliced Cheese provolone, havarti, brie, aged cheddar, or goat cheese
- Artisan Crackers Raincoast Crisps, fig & olive crisps, or other fancy crackers
- Optional Mixed Nuts almonds, walnuts, cashews for healthy fats and crunch
- Optional Sliced Fruit or Berries grapes, strawberries, dried apricots, etc.
Instructions
Classic Cheese and Crackers:
-
Prepare Meat & Cheese Rounds: Using a circular cutter (matching your cracker size), carefully cut both deli meat and cheese slices into neat, uniform rounds. Any leftover scraps can be ingeniously repurposed for salads or enjoyed as a quick snack.
-
Assemble Your Container: Thoughtfully arrange the stacked meat and cheese rounds into one section of your chosen lunch container. Place your selected crackers in another section. Finally, add a delightful sweet treat (like a mini chocolate bar or a small cookie) and some fresh fruit or another preferred snack into the remaining sections.
Nachos:
-
Fill with Dips: Add creamy queso to one section of your container, filling it approximately ¾ of the way. In a separate section, add your fresh salsa, also filling it about ¾ of the way to prevent spillage.
-
Add Chips & Treat: Carefully stack your round tortilla chips into two of the remaining sections. If desired, you can wedge a small sweet treat alongside the chips for a balanced meal.
Pizza:
-
Prepare Base & Sauce: Place your sturdy crackers (such as water crackers, ensuring they fit your container well) or mini pitas into one section of the container. Add your favorite pizza sauce to another section, filling it no more than ¾ of the way to prevent any mess.
-
Cheese & Optional Toppings: Fill a third section with a generous portion of shredded mozzarella or an Italian cheese blend. If desired, add mini pepperoni or other small, favorite pizza toppings to this section.
-
Sweet Finish: Fill the final section of your container with your favorite sweet treat, such as cookies, a mini chocolate bar, or some fresh fruit, to complete your pizza lunchable experience.
Adult (Charcuterie Style):
-
Slice the Meat and Cheese: Utilize circular cutters (or clean kitchen scissors*) to carefully slice your chosen charcuterie meats and premium cheeses into small, elegant rounds, perfect for stacking or pairing.
-
Assemble the Gourmet Box: Neatly stack the prepared meat and cheese together and place them in one section of your container. Arrange your fancy artisan crackers in another section. Fill a third section with a mix of nuts, and finally, add fresh or dried fruit (or berries) into the fourth section for a truly sophisticated and satisfying lunch.
Notes
Creative Use for Meat and Cheese Scraps: Never waste those delicious leftover pieces! They are perfect as a quick, satisfying snack, or can be finely chopped and cleverly incorporated into a flavorful chopped salad (like our popular Italian Sub Salad for a delightful meal!) or mixed into a hearty pasta salad for added protein and flavor.
Cutting Without Circular Cutters: No specialized circular cutters on hand? No problem! Simply create a small, round template using parchment paper, matching the exact size of your chosen crackers. Place this template over your deli meat and cheese slices, then carefully cut around it with clean, sharp kitchen scissors. Always ensure your scissors are thoroughly washed and sanitized both before and after use for food safety.
Please note that some of my blog posts here at Dash for Dinner may contain affiliate links. If you make a purchase through these links, I will get a small commission at no additional cost to you. Please see my Disclaimer for more information.
